Guide to setup SensusAccess LTI with Sakai
-
Register an account with SensusAccess LTI. Register. Once registered with SensusAccess LTI, one can receive an email confirmation mail with an approval link. Once clicked on the link and successful confirmation message, one can log in into the SensusAccess LTI portal. Remember to check spam email, if you do not see the confirmation email in the inbox.
-
Contact Sensus in order to get your LTI access credentials. In order to process your request please make sure to specify in your email/call/letter the following:
- A mention that you are requesting a SensusAccess LTI account
- Organization name (School/University)
- Full name of contact the person responsible for the SensusAccess LTI account
- The desired email address associated with the SensusAccess LTI account
- Name of the LMS Type (Sakai), you are requesting for
-
Sakai OAuth tool configuration
You can skip the Sakai OAuth tool configuration section if the tool is already configured in the instance. If so, you can move to the next section Sakai OAuth consumers configuration.
In order to enable OAuth flow, you must have administrator login and need to follow the following steps:
-
Login Sakai instance with administrator credentials and go to the Administration Workspace.
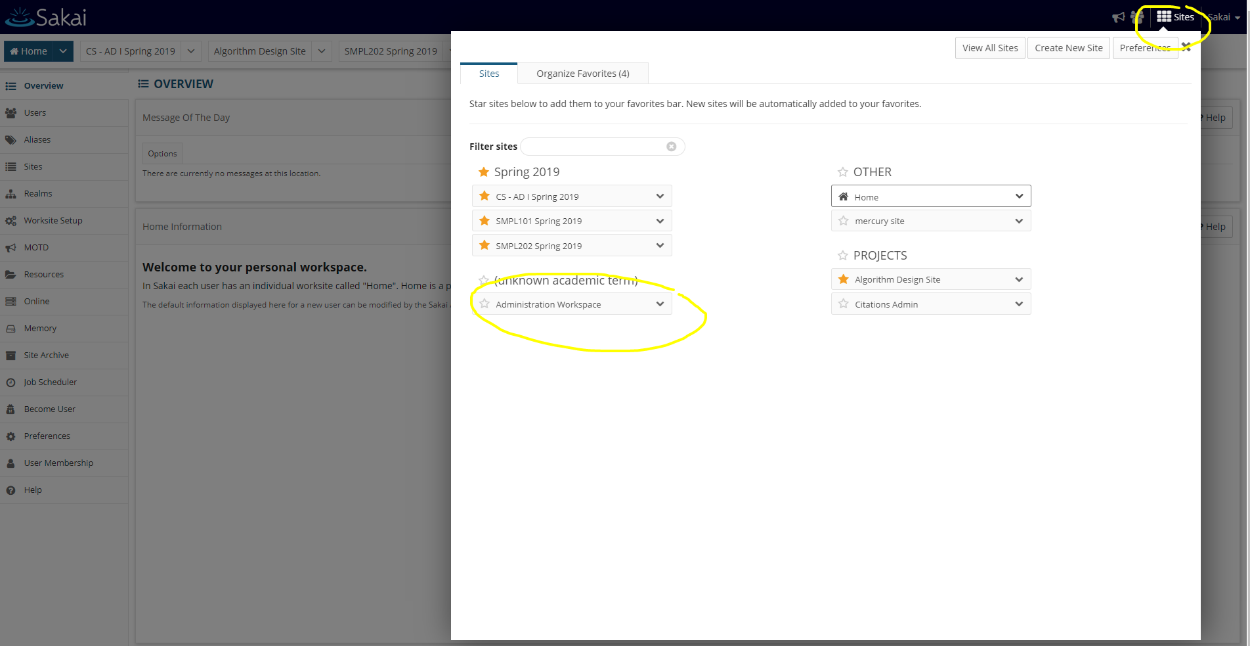
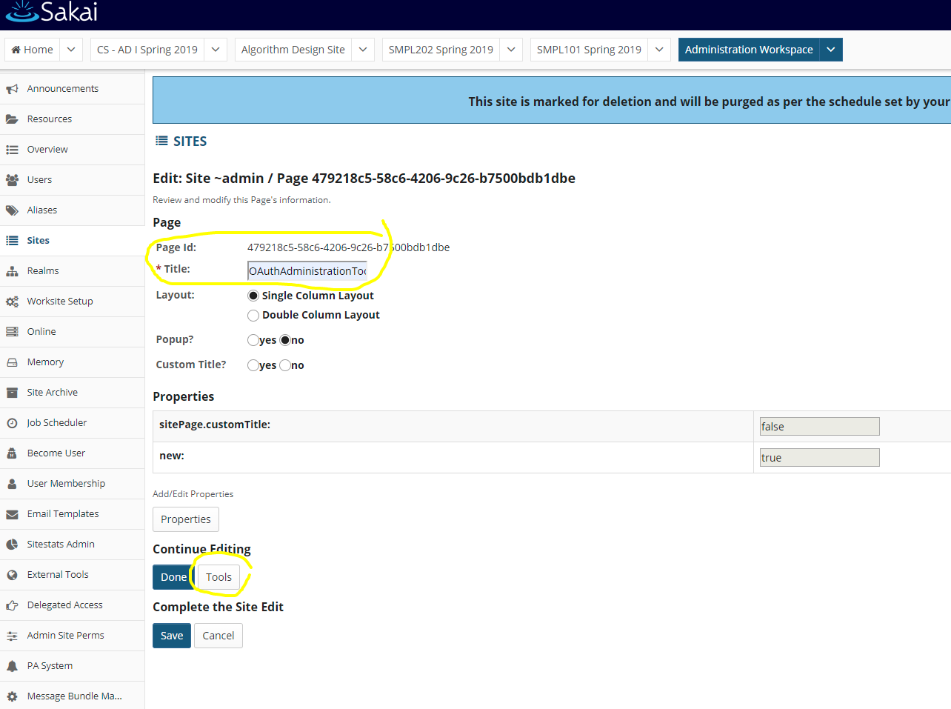
On the left panel, click on Sites menu and click on Edit site icon on the Site Id !admin.
Click on Add/Edit pages at the bottom of the page.
Click on New Page and add Title of the page.
-
Click on Tools in Continue Editing section at the bottom of the page.
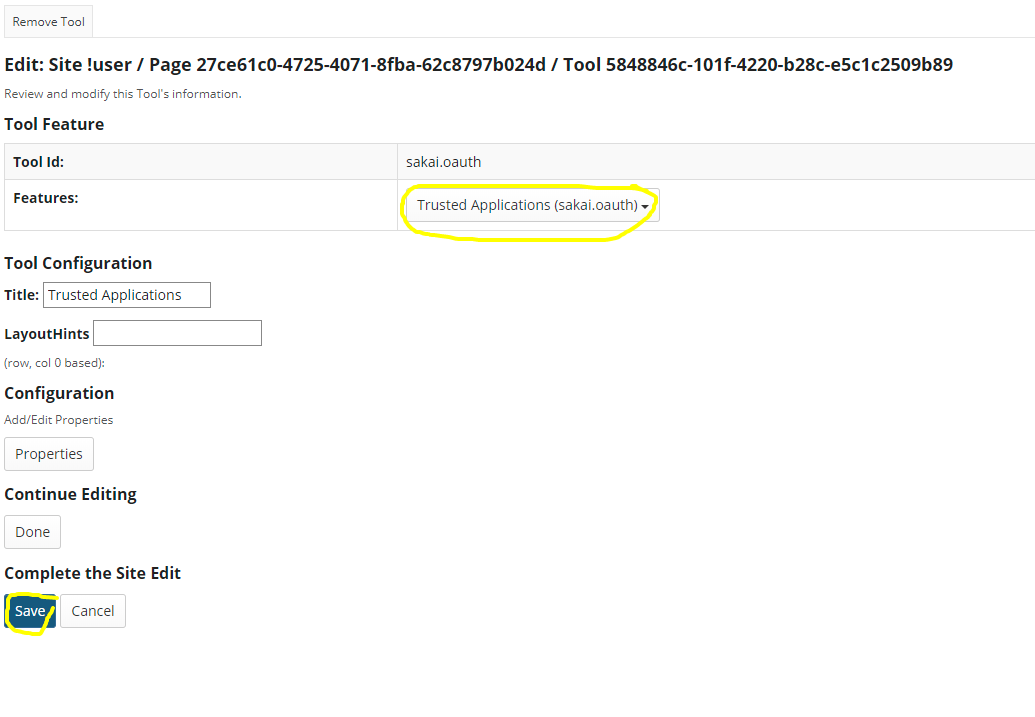
You have to add a new tool in the page by clicking on New Tool at the top of the page.
-
Then you have to select oAuth Admin(sakai.oauth.admin) in the features dropdown.

-
Like !admin, you have to edit the !user template by clicking on Edit site icon. If it is difficult to find the template !user in the listing, you could use search filter in the page by just typing !user in the search box.
-
You have to scroll down the page and click on Add/Edit pages.
Click on New Page at the top of the page.
You have to provide the Title and click on the Tools.
-
After the new tool button is clicked, you have to select Trusted Applications (oauth.admin) in the features dropdown.
-
Now it is time to refresh the page by clicking on the refresh icon in the browser on the Administration Workspace and oAuth Admin should appear on the left menu.
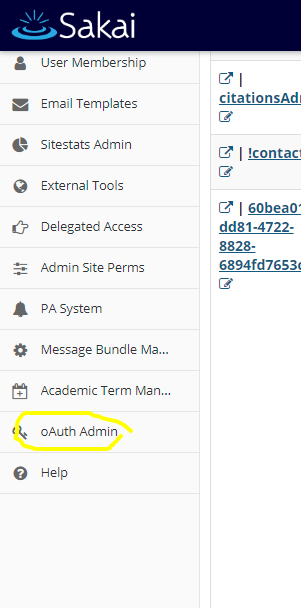
Click on the oAuth Admin on the left menu
-
Click on Add a consumer link and fill the form. You have to at least provide the following details while filling the form and the oAuth callback URL should always be https://lti.sensusaccess.com/home/oauth1response.
Consumer’s key: Any text
Consumer’s name: Any text
oAuth callback url: https://lti.sensusaccess.com/home/oauth1response
oAuth secret: Any text -
You need to provide some rights for this consumer. Below in the image you can find which rights need to be checked and they are higlighted inside the red circle.
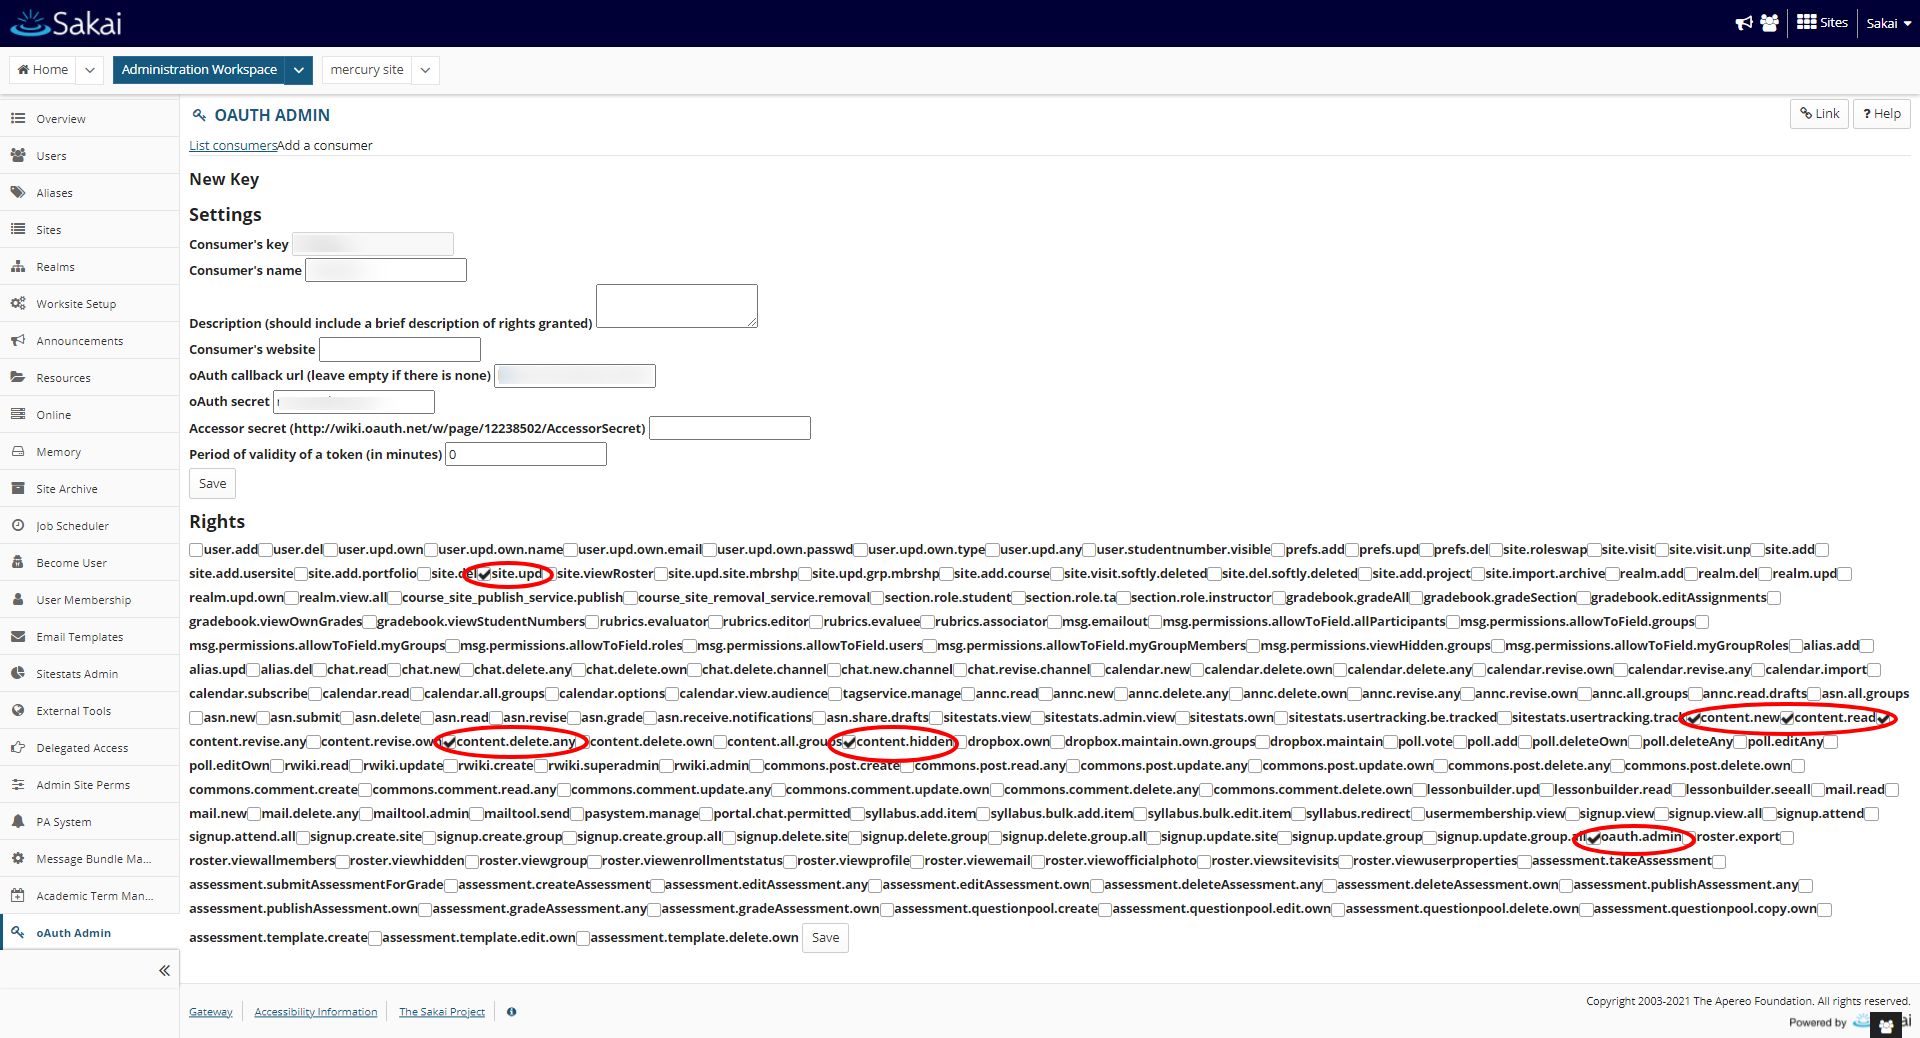
You can note down the Consumer's key and oAuth secret because these pieces of information are needed in the SensusAccess LTI portal later. Click on Save button.
Click on Enable record mode in the consumers listing.
-
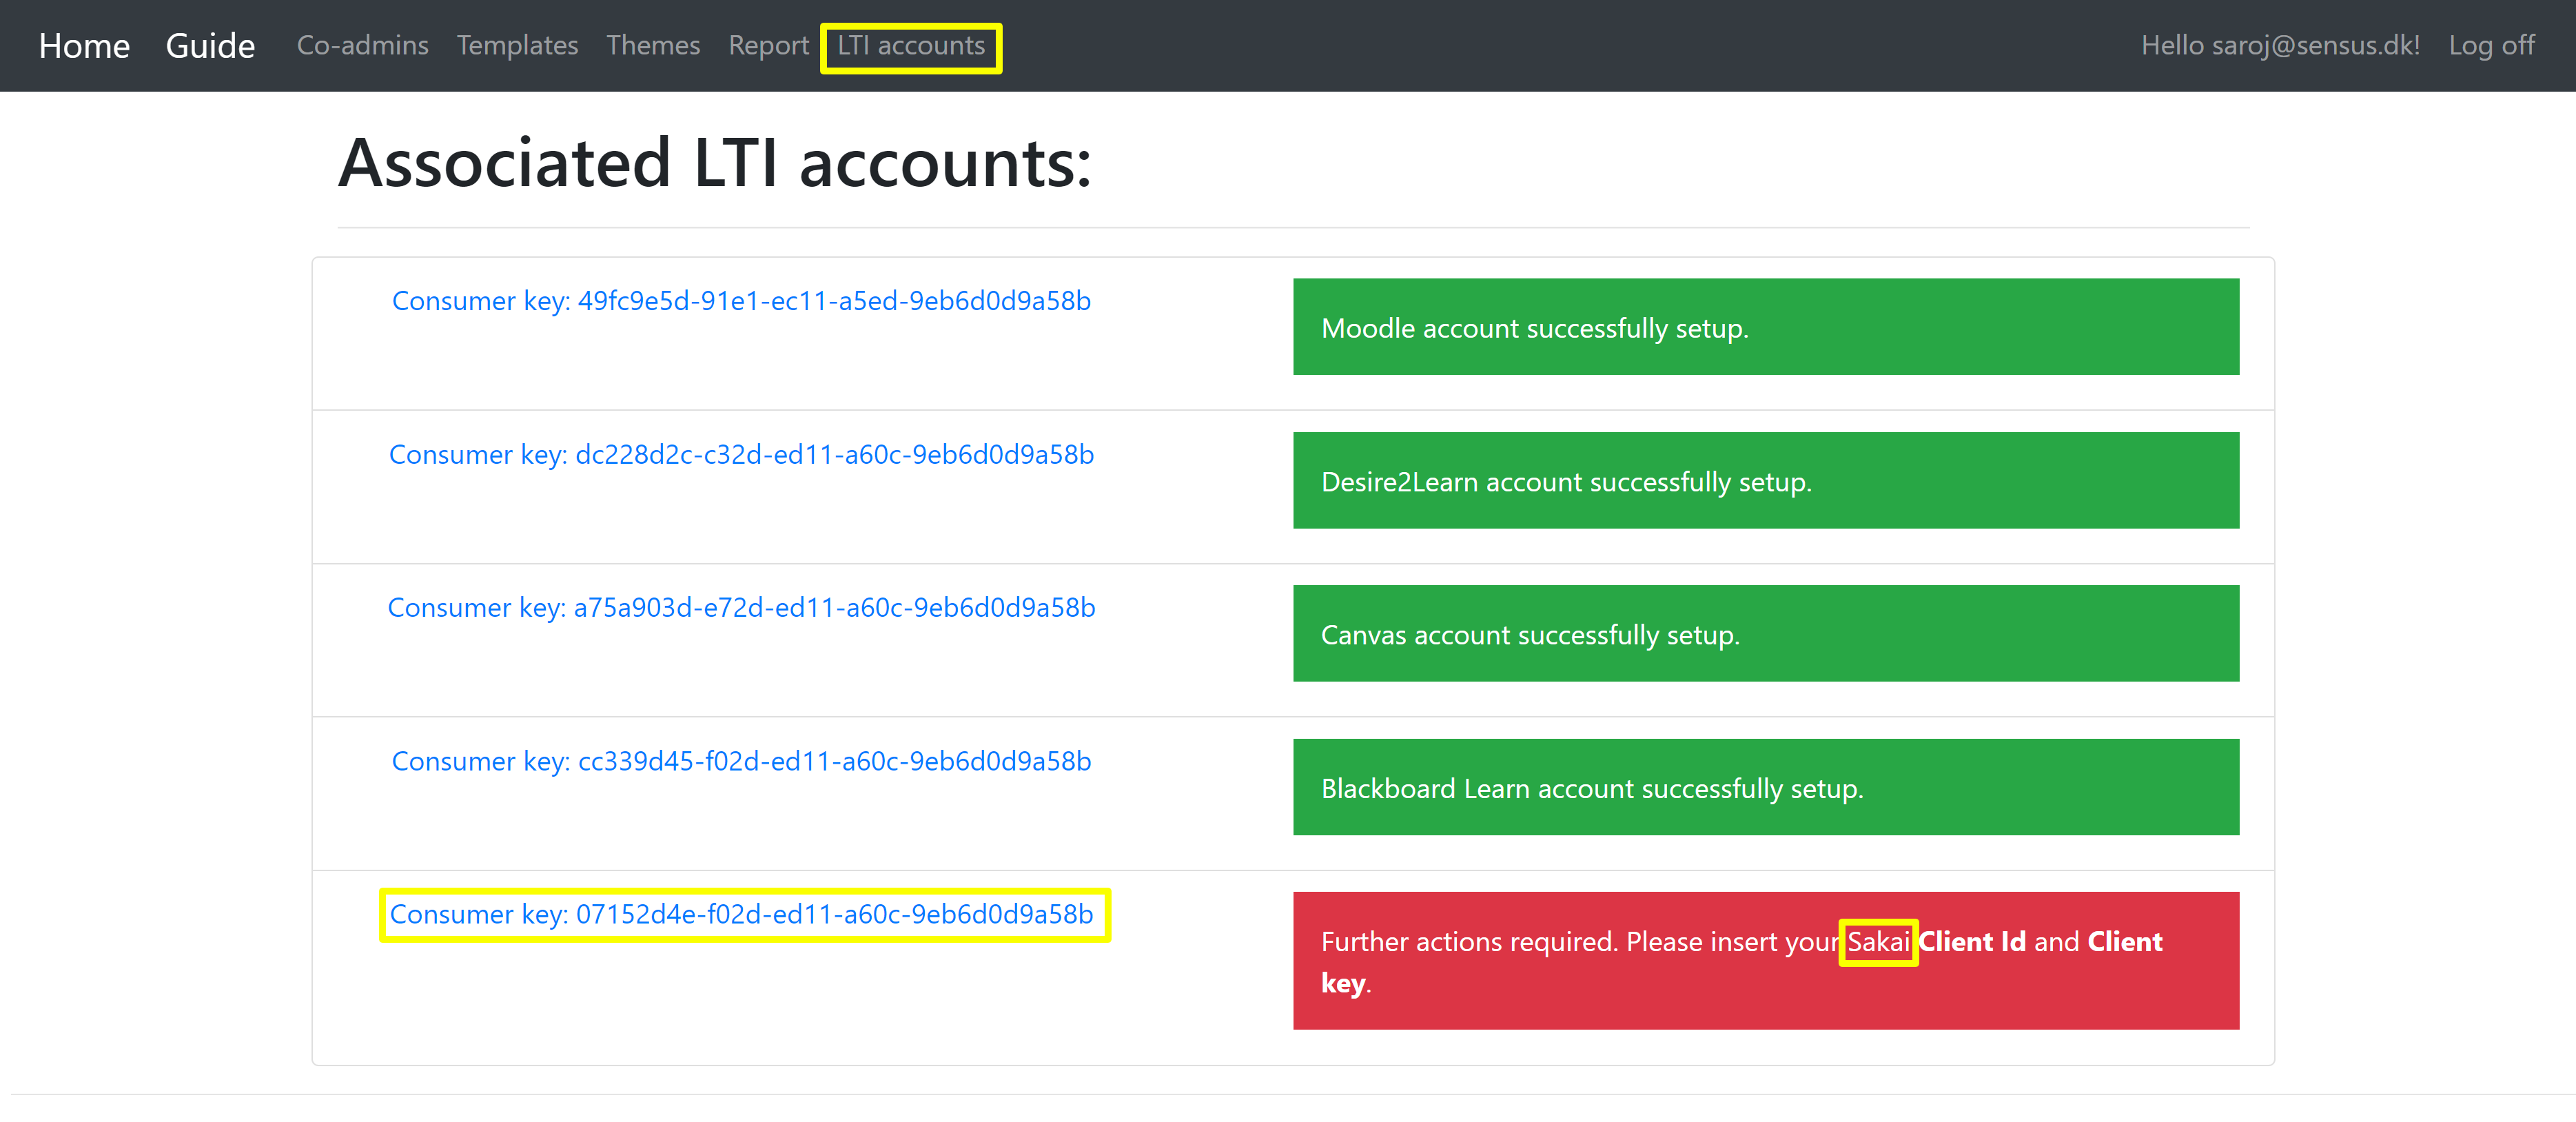
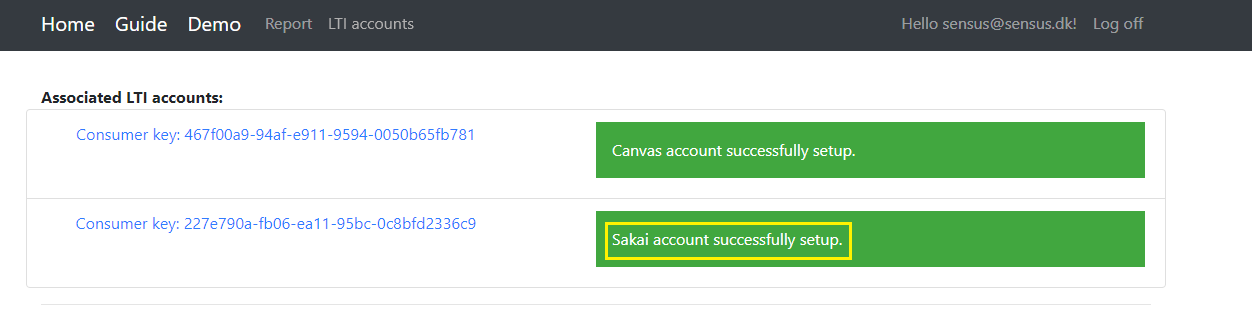
Go to your SensusAccess LTI account and then click on the LTI accounts navbar option. There might be more than one LTI accounts listed in "Associated LTI accounts" section, if the account is associated with multiple LMS.
-
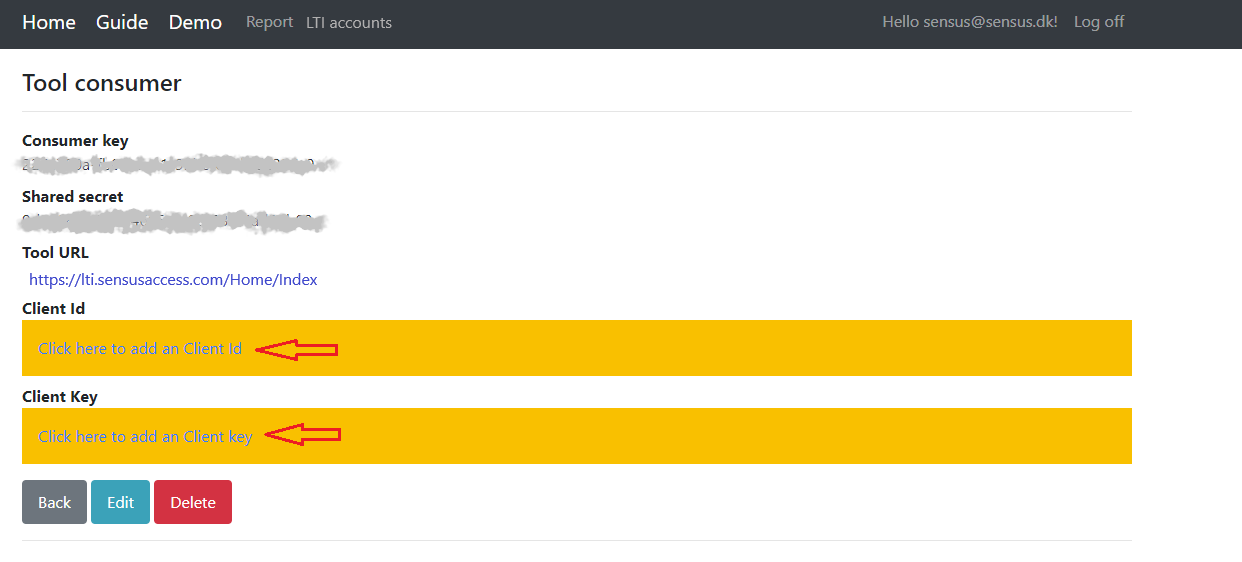
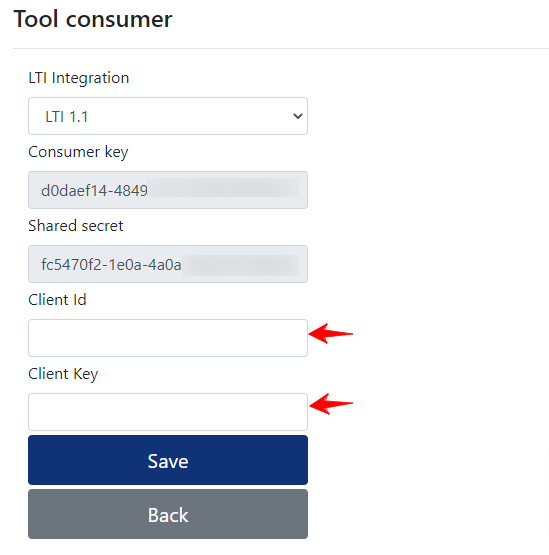
You have to input Consumer key in Client Id field and oAuth Secret in Client Key that you received in step 19.
-
Insert the Consumer key in Client Id field and oAuth Secret in Client Key that you received in step 19 and then click Save.
-
Remaining in the LTI account page, you will see the Consumer Key, Shared Secret and the link for the LTI tool.

Use these in order to link your LMS system to the SensusAccess LTI Tool. -
Note: Now, after logging into the SensusAccess LTI portal the Associated LTI account you have just finished setting up will appear in green.
Sakai OAuth tool configuration
Now lets embed the SensusAccess form inside any course within your LTI.
Configure the external tool in a course/project
Now it is time to configure the external tool to a course. To do so one has to follow the following steps:
Click on the Administration workspace.
Click on External Tools in the left panel.
Click on Install LTI 1.x Tool
-
Fill the form with the below mentioned fields:
Site Id: Leave Site Id blank
Tool Title: Give proper tool title for example SensusAccess LTI
Button Text: Give proper button text
Launch URL: https://lti.sensusaccess.com/LTI13/OIDCLogin
Privacy Settings: Please check in the following options in the privacy settings.- Send User Names to External Tool
- Send Email Addresses to External Tool
Please check Tool supports LTI 1.3
LTI 1.3 Tool OpenID Connect/Initialization Endpoint (provided by the tool): https://lti.sensusaccess.com/LTI13/OIDCLogin
LTI 1.3 Tool Redirect Endpoint(s) (comma separated and provided by the tool): https://lti.sensusaccess.com/LTI13/LTIResponse
Type of LTI 1.1 Launch to Use: Please check Inherit System-Wide Default Click on Save button
- Once completed one can see the configured tool. After this, click on edit and then you will be redirected to your tool.
-
Please go to the bottom of the page as shown in the following image.

-
In this page, you have to add a querystring to the LTI 1.3 tool OpenID Connect/Initialization Endpoint.
https://lti.sensusaccess.com/LTI13/OIDCLogin?client_id=YourClientID
- Please replace YourClientID with your LTI 1.3 Client ID as shown in the above screenshot by the red arrow.
-
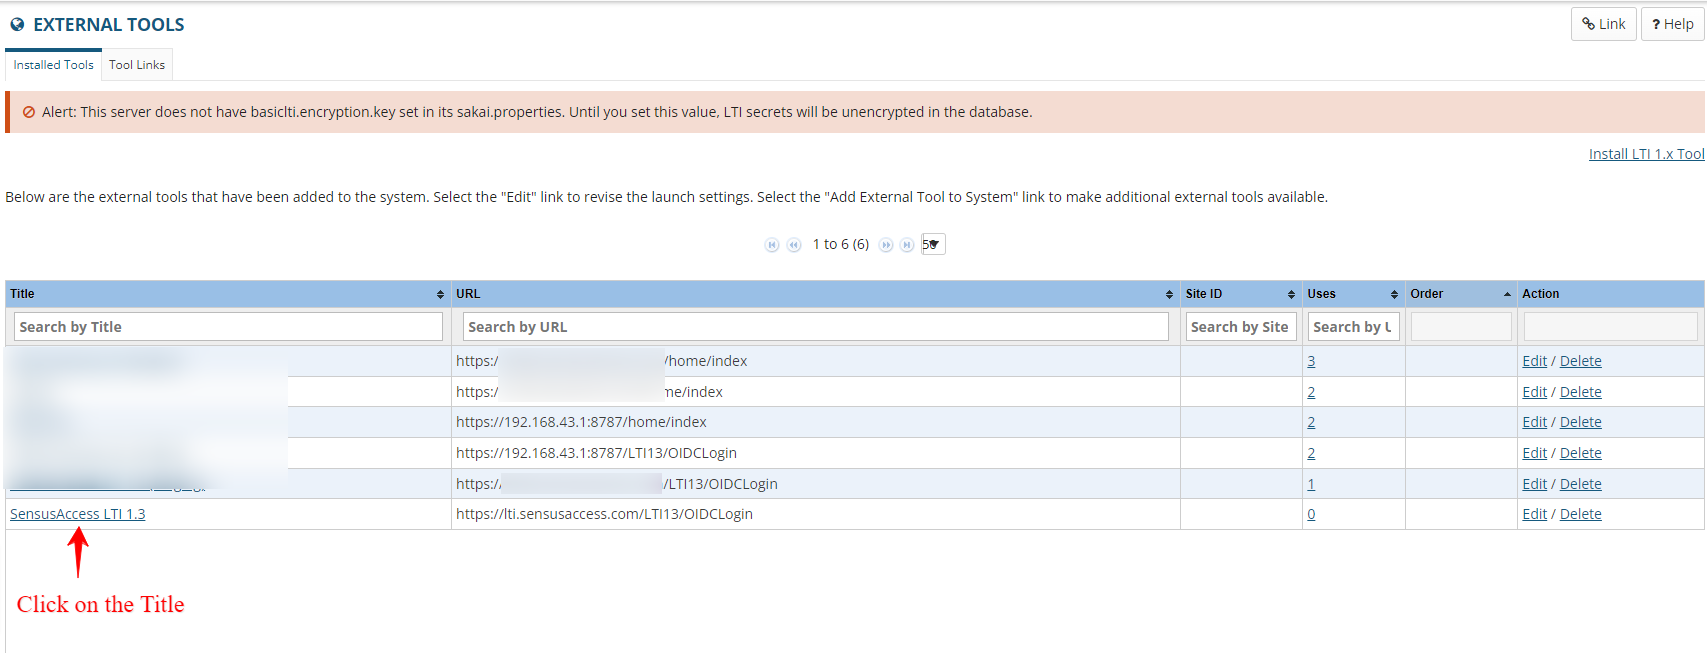
At this time, you will have to figure out LTI 1.3 Client ID (provide to the tool) and LTI 1.3 Platform OIDC Authentication URL (provide to tool) for the External tool you registered.
To get the LTI 1.3 Client ID and LTI 1.3 Platform OIDC Authentication URL, click on the tool you just created from the list.
-
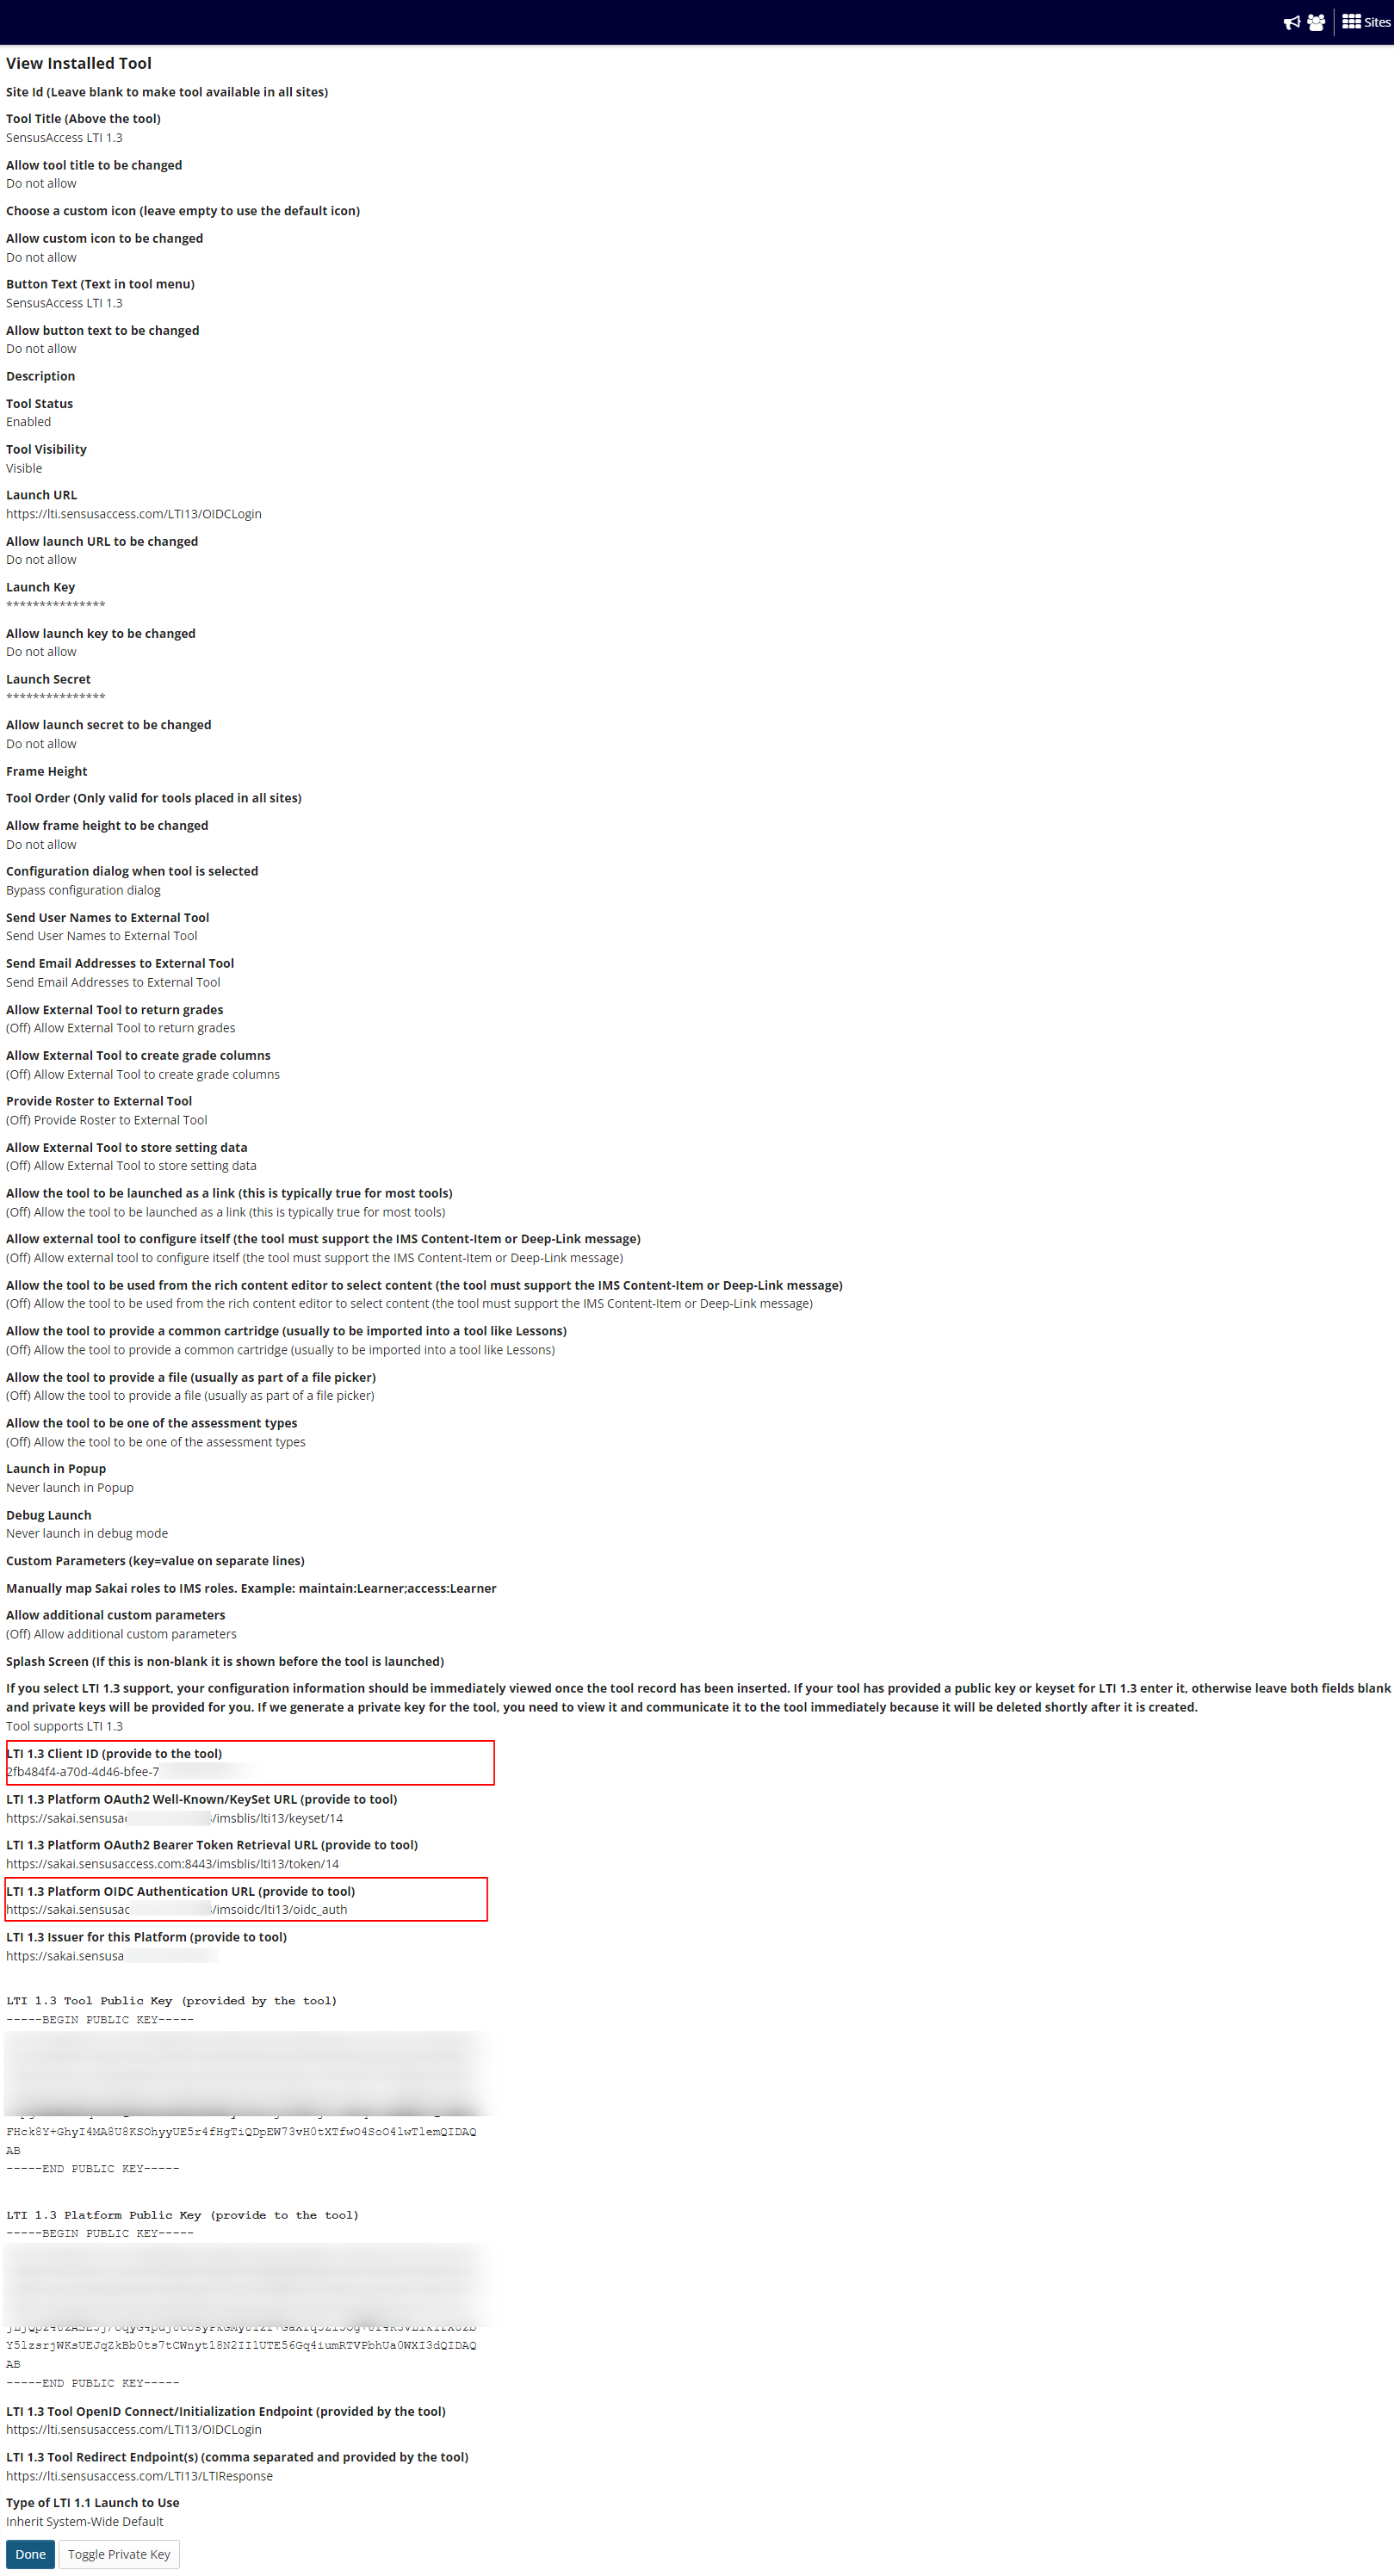
Note the values for the LTI 1.3 Client ID (provide to the tool) and LTI 1.3 Platform OIDC Authentication URL (provide to tool) in your Sakai instance (see red lined block in the below screenshot) and add them to the SensusAccess LTI portal which is in the next step.
-
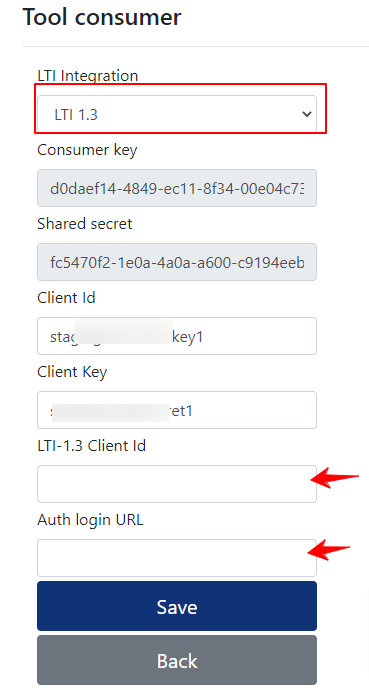
Now it is time to add LTI-1.3 Client Id and Auth login URL in the SensusAccess LTI portal. Click on the Edit button in your account in the SensusAccess LTI and choose LTI 1.3 in the LTI integration dropdown.
When you click on the LTI integration, two input boxes appears LTI-1.3 Client Id and Auth login URL.
Now the SensusAccess LTI tool is available to all courses.
-
Now the SensusAccess LTI tool is configured properly and it's time to test the tool. The SensusAccess LTI tool doesn't run with Administrator role, so you hvae to login with the Sakai system with different user role for instance Instructor, Student, Teaching Assistant etc. Administrator user doesn't support OAuth flow in Sakai.
Please activate the external tool in your course. To do go through following steps:
- Go to any course and click on the Site Info of your course on the left menu.
-
Go to the Manage Tools tab and scroll down to the bottom of the page and extend External Tools as shown in the below screenshot.
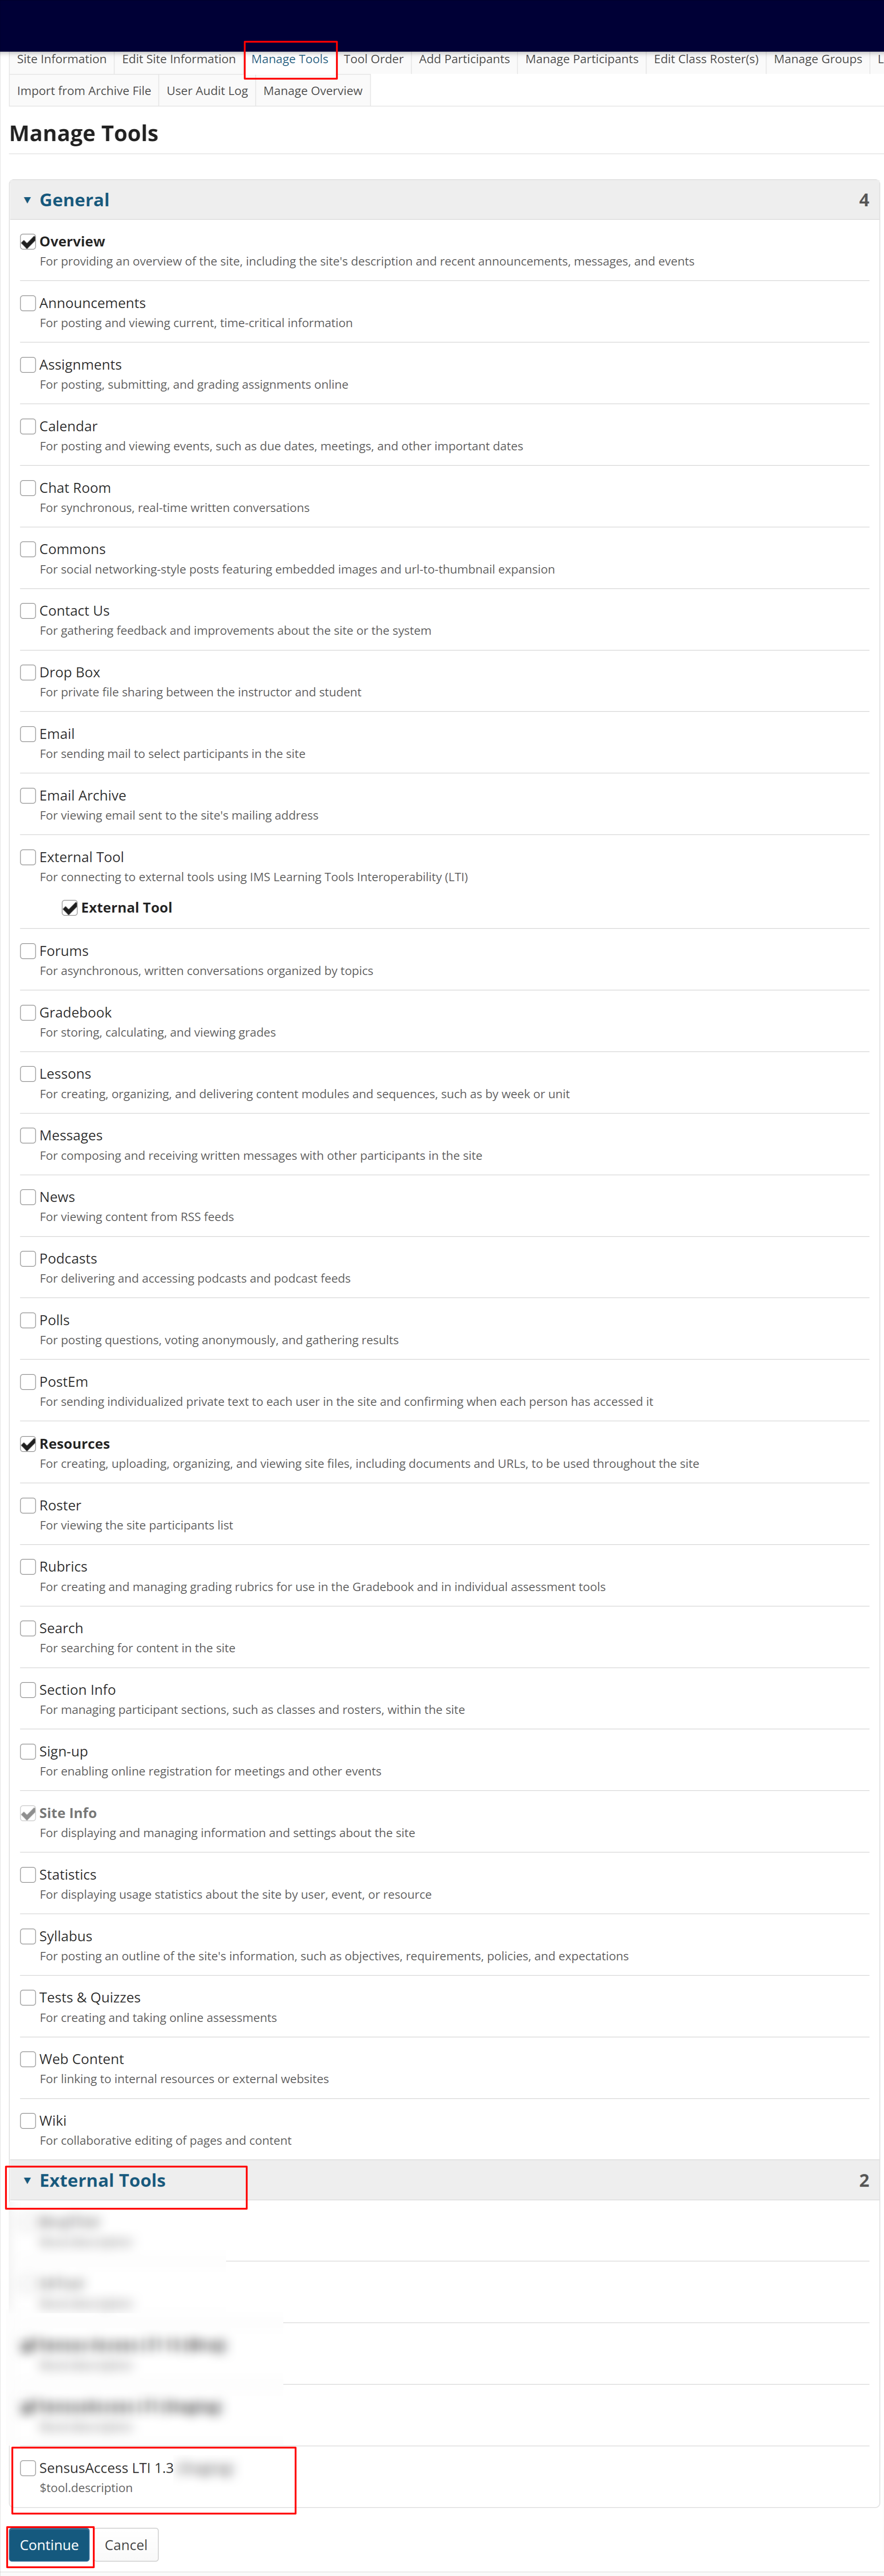
- Then check in the tool you just created and click Continue and then Finish in next page.
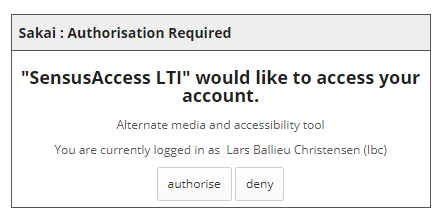
In the course/project, if the user clicked on the SensusAccess LTI tool, SensusAccess conversion tool will be displayed. For the first time, the tool will ask the user's permission to access the course files and once the user gives the permission, the conversion form will be displayed. The user can revoke the permission anytime from the Trusted Applications menu.
Note:
As Safari browser by default does not allow third party cookies in an iframe. To make the tool runnable in the Safari browser, the user has to uncheck the checkbox Prevent Cross-Site Tracking in Safari browser. See the screenshots below:
Safari browser settings in Mac

Safari browser settings in iPhone/iPad

-
Once done you will be able to add the LTI Tool to any course and the SensusAccess form will appear.
The form will load automatically when clicking on the embedded link inside any course, as in the Demo. It should also be able to list all files within the course and the conversion results will be available either for direct download or sent to the email address of the logged in user.
If instead of the SensusAccess form you are presented with the SensusAccess LTI home page. Please check again that all the necessary configurations have been done correctly and that you have added the correct API token/Consumer key/shared secret/Application Id etc. inside your SensusAccess LTI account.
Note: If you experience problems with any of the above steps, please contact us via the contact options on sensusaccess.com