Guide to setup SensusAccess LTI with Moodle
-
Register an account with SensusAccess LTI. Register. Once registered with SensusAccess LTI, one can receive an email confirmation mail with an approval link. Once clicked on the link and successful confirmation message, one can log in into the SensusAccess LTI portal. Remember to check spam email, if you do not see the confirmation email in the inbox.
-
Contact Sensus in order to get your LTI access credentials. In order to process your request please make sure to specify in your email/call/letter the following:
- A mention that you are requesting a SensusAccess LTI account
- Organization name (School/University)
- Full name of contact the person responsible for the SensusAccess LTI account
- The desired email address associated with the SensusAccess LTI account
- Name of the LMS Type (Moodle), you are requesting for
-
Log in to your Moodle as administrator. Click on Administration (block) → Site Administration → Plugins → Web services → Overview.
We are specifically concerned with links and information in the section titled Allow an external system to control Moodle.
(Note: This page shows an overview of Moodle's current web service configuration. You may wish to keep this page open, and open any links in a new tab or window, refreshing this page on your return. )
-
Click 1. Enable web services. Check the box (a tick, cross or other identifying mark will appear, depending on your web browser) to turn web services on, then click Save settings. Return to the Web services → Overview screen.
The overview screen should now show yes next to 1. Enable web services in the status column.
-
Click 2. Enable protocols. Enable the REST protocol: click on the eye with the line through it, it will become open. The other protocols are not required LTI tool.
Return to the Web services → Overview screen. It should now show (at least) REST next to 2. Enable protocols in the status column.
-
A specific user is required to act as Moodle's avatar for incoming web services. Only one user is required for the SensusAccess LTI tool.
Click 3. Create a specific user. Create this Sensus LTI user as you see fit: give it a relevant username ("sensusltiuser") and a strong password, as this user will have read/view and download access over Moodle files.
-
Create a new role ("Sensus API role") with appropriate protocol capabilities allowed (webservice/rest:use). Click on Administration (block) → Site Administration → Users → Permissions → Define roles, and click on Add role.
Moodle 2.7: In Moodle 2.7 you are presented with a page with the option Use role or archetype and some others, which you do not get in Moodle 2.6. Simply ignore these options and click Continue.
Type in a relevant short (internal) name and a full (human readable) name, as well as a description (will only be seen by admins). Ignore Role archetype. Check only the system check box. Search for and allow the following capabilities:
Web service: REST protocol
- webservice/rest:use (Use REST protocol)
Course
- moodle/course:view (View courses without participation)
(Note: the best way is to use your web browser's search feature and search for the text exactly as it appears: it will get you to the exact capability or very close.)
-
Assign the new Sensus API role to the Sensus LTI user as a system role: click on Administration (block) → Site Administration → Users → Permissions → Assign system roles. Click on Sensus API role (or whatever you have named your new role), then search in the box on the right for the new Sensus LTI user, then add the new user so the name appears in the box on the left. It should be the only name in that box. Return to the Web services → Overview screen.
-
Click 4. Check user capability. Search for the user just created, then click on the name, then click Show this user's permissions.
The results page should show the user as assigned to the Sensus API role (what appears on-screen will be whatever you called the web service) in system context, and authenticated user in system context.
Check that the list of capabilities in 7, above, is set to yes (possibly highlighted in green, depending on your theme). When done, return to the Web services → Overview screen.
-
Click 5. Select a service. In the Custom services section, you have to add a service for SensusAccess LTI. To do so, click on the Add button under the Custom services section. Give proper Name, Short name and click on the Show more… a link at the bottom above Add service button and check the checkboxes labelled as Enabled, Authorised users only, Can download files and click on Add service button.
Once Add service button is clicked, you are redirected to a page Add functions to the service “your service name” and click on the Add functions link. In the Add functions page, you have to add 5 functions to the service by choosing from the dropdown list. Once you haven chosen the 5 functions, click on the Add functions button which will add functions to the service. The functions that you have to add are listed below:
Function Description core_course_get_contents Get course contents core_course_get_courses Return course details core_course_get_courses_by_field Get courses matching a specific field (id/s, shortname, idnumber, category) core_files_get_files browse moodle files core_webservice_get_site_info Return some site info / user info / list web service functions If you want the files from the Assignments and Forums to be displayed in the SensusAccess tool, you need to add a few capabilities and functions to the service. In addition to step 7, you need to add four more capabilities as mentioned below:
Activity: Assignment- mod/assign:grade (Grade assignment)
- mod/assign:view (View assignment)
- mod/forum:viewdiscussion (View discussions)
- mod/forum:viewqandawithoutposting (Always see Q and A posts)
The additional functions that you need to add are listed below and after adding the mentioned functions, you need to enable enable Scan Modules and Scan Assignments which is in the follow the configuration mentioned in step 19.Function Description mod_assign_get_assignments Returns the courses and assignments for the users capability mod_assign_get_submissions Returns the submissions for assignments mod_forum_get_discussion_posts Returns a list of forum posts for a discussion. mod_forum_get_forum_discussions Returns a list of forum discussions optionally sorted and paginated. mod_forum_get_forums_by_courses Returns a list of forum instances in a provided set of courses, if no courses are provided then all the forum instances the user has access to will be returned. -
Assign the Sensus LTI user to the service created in step 10: Click on Administration (block) → Site Administration → Plugins → Web services → Overview.
Click 7. Select a specific user.
There should be the service you created in step 10. Clicking on Authorised users next to Sensus LTI will show you a list of users authorised to use the Sensus web services.
In the box on the right, search for and click on the name of the "Sensus LTI user" you created in step 6 , then add the new user so the name appears in the box on the left.
At the bottom of the page is a section titled Change settings for the authorised users: if there are any problems with the assigned user (for example, the user lacks a required context) they will be listed here in orange, and will need to be fixed before progressing further. Clicking on the user's name or email address will show some further security options, such as IP restriction (so a user can access the web service only from one or a range of IP addresses, blank by default) and a Valid until date when the access will cease (off by default). If you change any settings here, click Update to save them.
Back on the External Services page, clicking the Edit button next to Sensus LTI allows you to rename the web service (not recommended) and enable/disable the service. It is enabled as default.
When done, return to the Web services → Overview screen.
-
Click 8. Create a token for a user.
In the box, search for and click on the name of the "Sensus LTI user" you created in step 6.
Select Sensus LTI from the Service drop-down list, if it is not already chosen. (If you have Moodle mobile web services enabled, then they will appear also and I believe are the default option.)
If you wish, you may restrict the IP addresses from which the Sensus LTI User is allowed to log in from. Please login to your account with us if you wish to see the IP address where the SensusAccess LTI Tool is currently hosted at. This way, if someone does find out the username and password for this user, they still won't be able to log in unless they also gain access to the hosting server of our LTI tool.
If you wish to restrict the date until which this user can log in with this token, check the Enable checkbox and set the date accordingly, either with the drop-down menus or by clicking on the date-picker menu icon. Remember that you may always create another token for this user at any time, with a longer (or no) expiry, many can run concurrently, but always make sure the currently valid token is linked with your SensusAccess LTI Tool account.
Click Save changes when done. You will be taken back to the Manage tokens screen, which will now show an alphanumeric token next to the name of your user. Your token will look something like a180245560982a0e48e43577238c0198. This token must be linked to your account with us. This will give the LTI Tool the capabilities to retrieve files from the courses it is embedded in. Treat this token like a password, keeping it secret and known only to those who absolutely need it, as anyone who has this token potentially has full access to all the webservices you selected earlier.
Note: If you ever need to see tokens for authorised users, click on Administration (block) → Site Administration → Plugins → Web Services → Manage Tokens. This is the admin screen, and therefore all tokens, are available to anyone who is an Administrator on your Moodle.
-
When done, remain on the Manage tokens screen or copy your token as you will need it in order to link your moodle to our LTI tool.
-
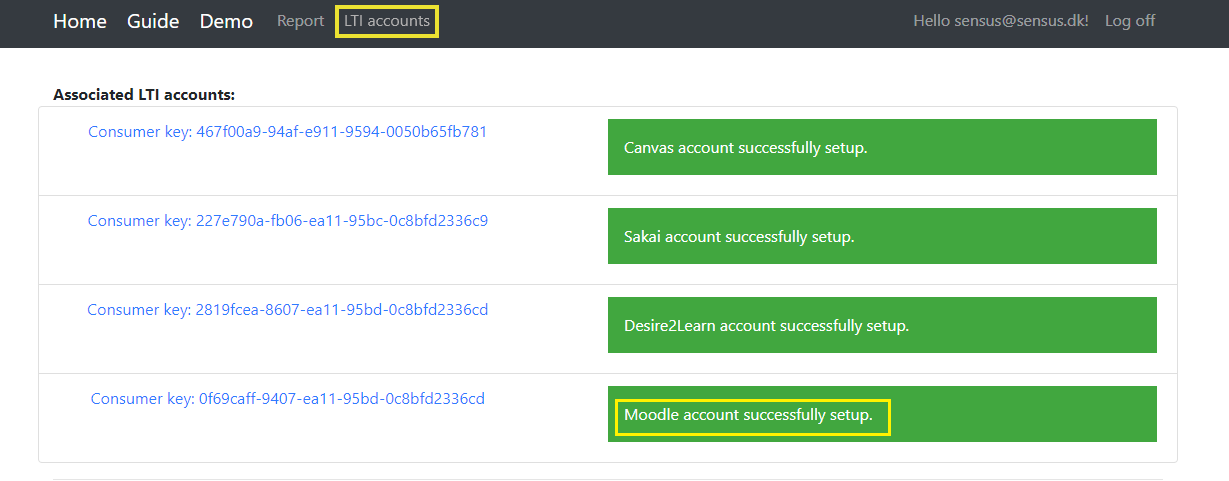
Go to your SensusAccess LTI account and then click on the LTI accounts navbar option. There might be more than one LTI accounts listed in "Associated LTI accounts" section, if the account is associated with multiple LMS.

-
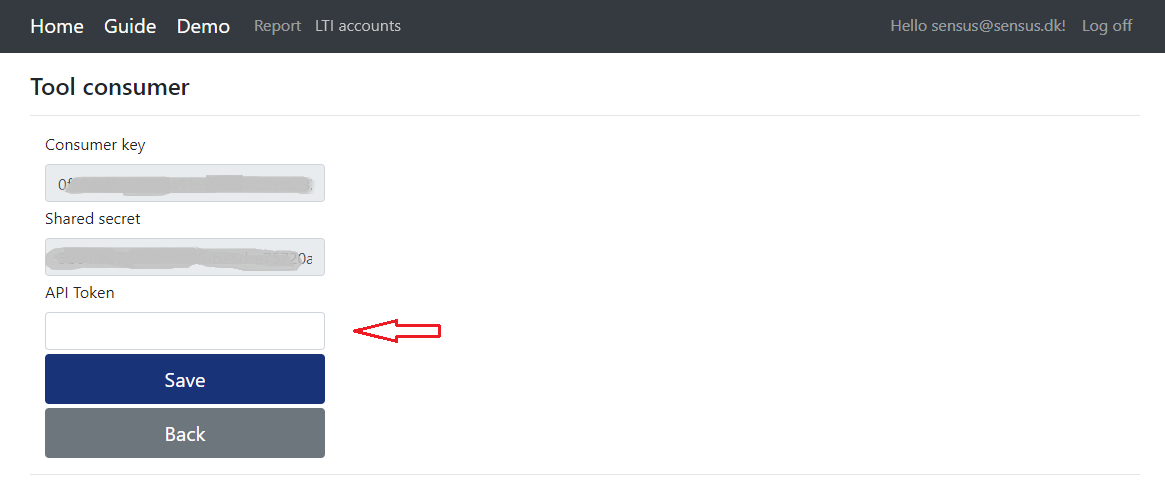
You have to input API token from step 13.

-
Insert API Token from step 13 and then click Save.
-
Remaining in the LTI account page, you will see the API Token, and the link for the LTI tool.

Use these in order to link your LMS system to the SensusAccess LTI Tool. -
Note: Now, after logging into the SensusAccess LTI portal the Associated LTI account that you have just finished setting up will appear in green.
-
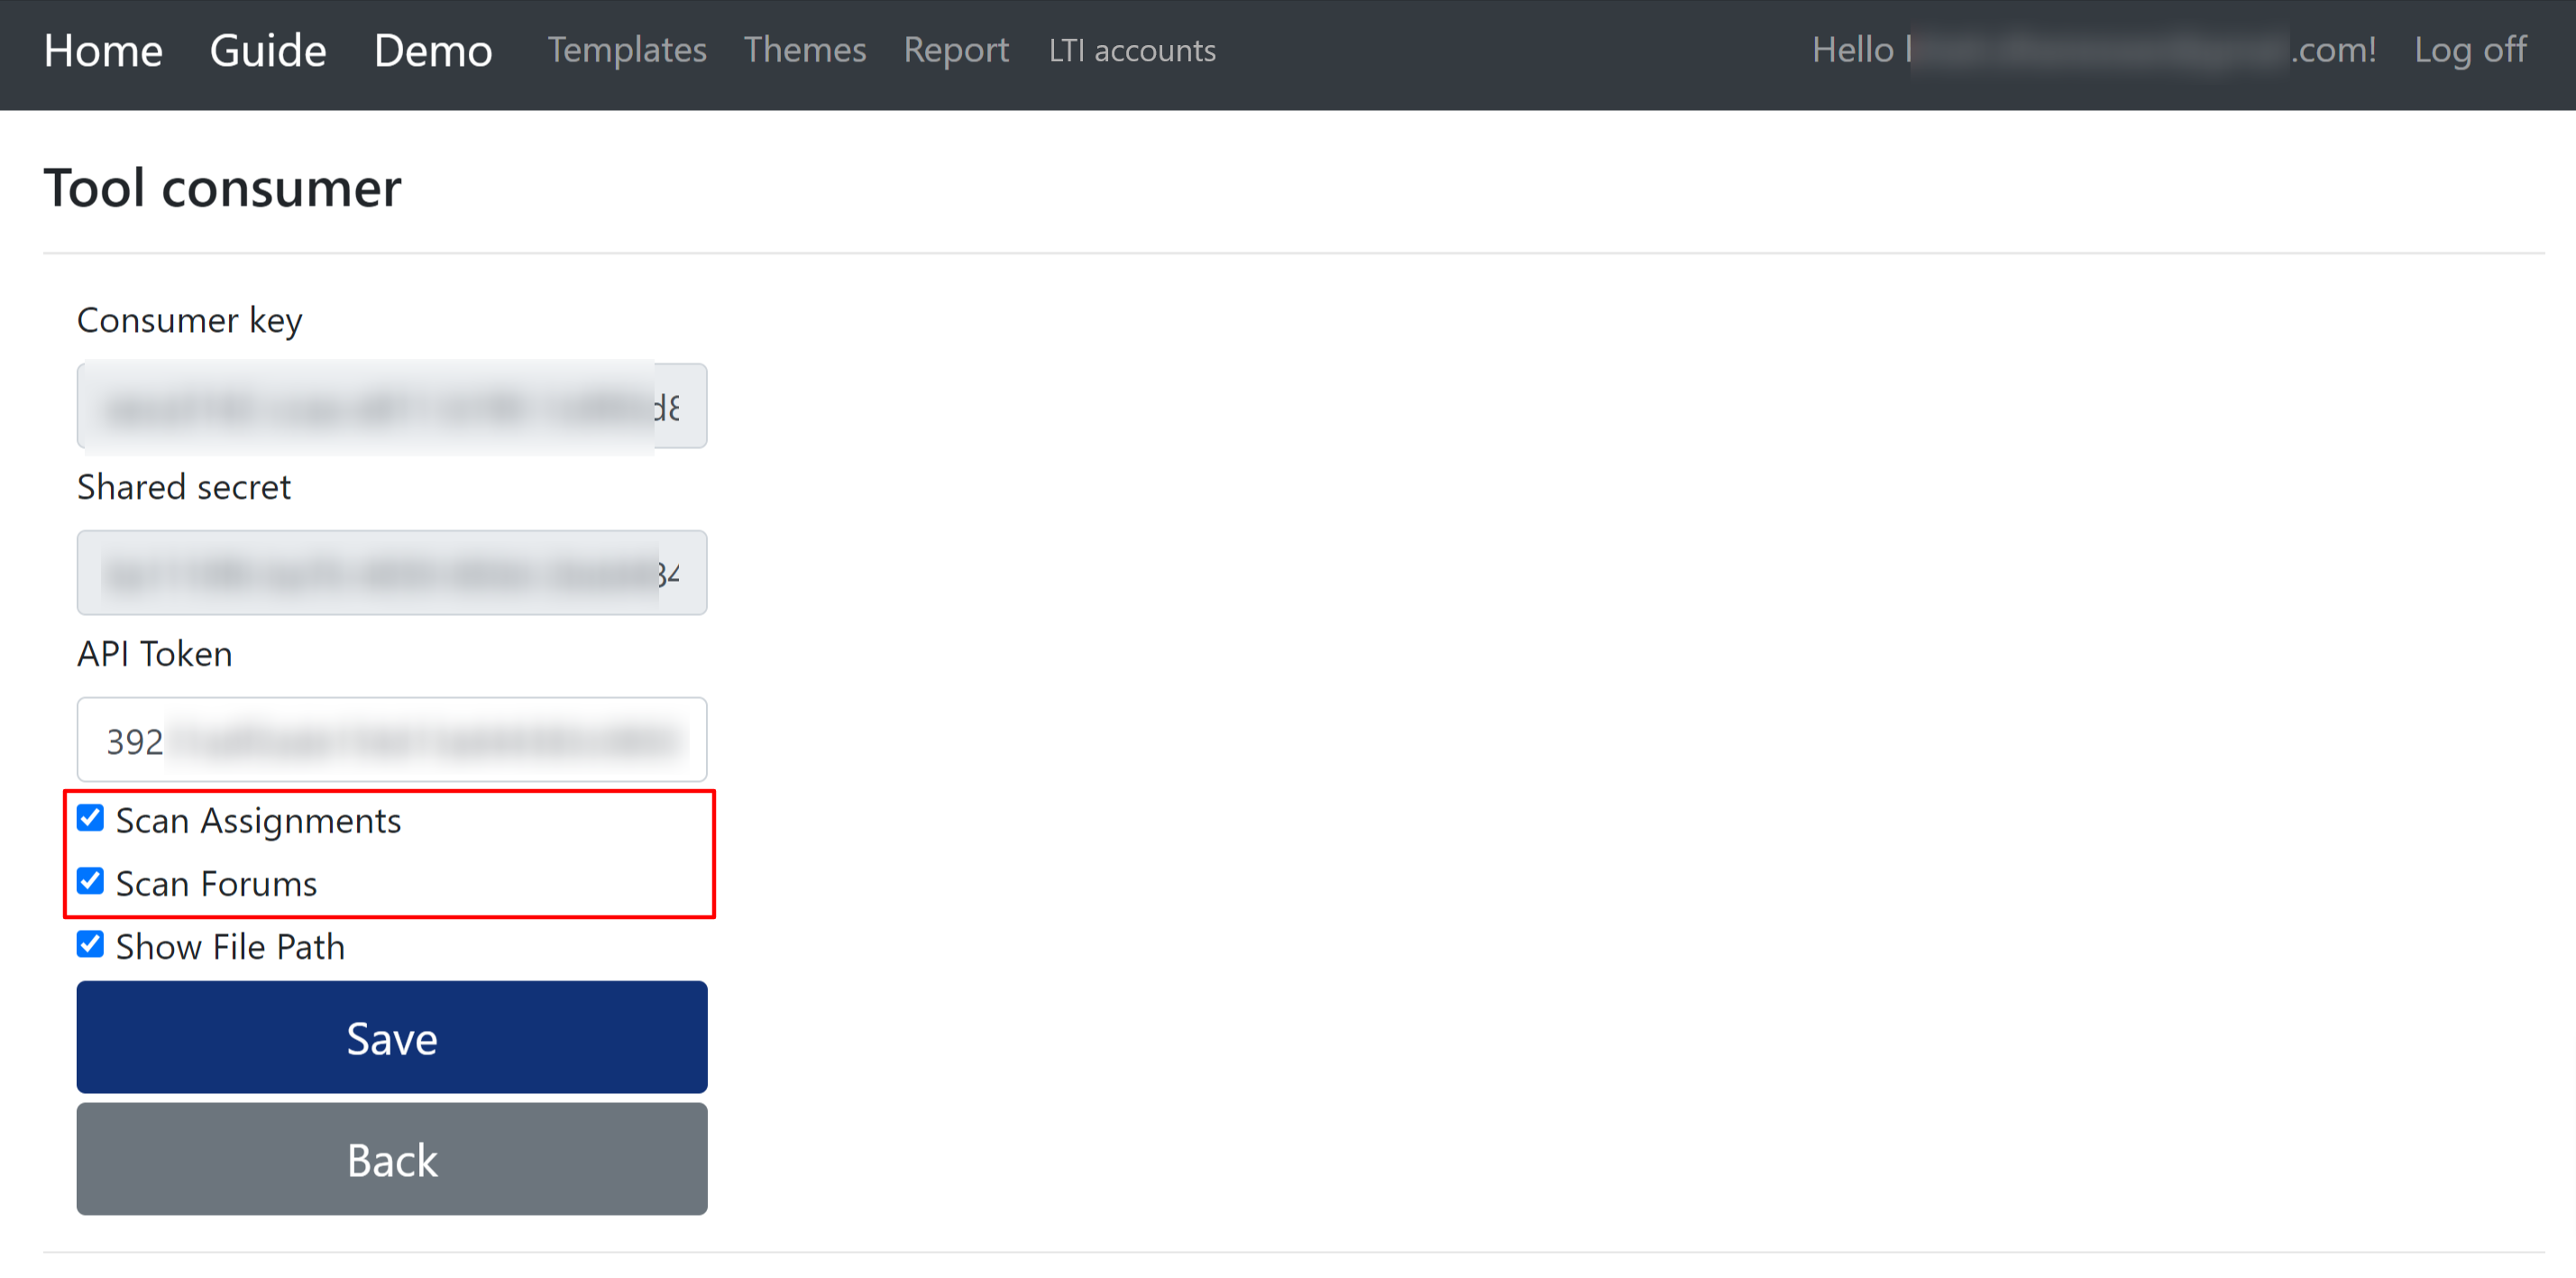
If you want to show the files from the Assignments and Forums, you need to check the checkboxes of Scan Assignments and Scan Forums options in your SensusAccess LTI Moodle account and save it. If you enable Scan Assignments and Scan Forums, it is necessary to add the additional capabilities and functions according to the step 10. You can disable Scan Assignments and Scan Forums at any time if you wish.
Now it’s time to add SensusAccess LTI as an external tool. To do so, please go through the following steps:
-
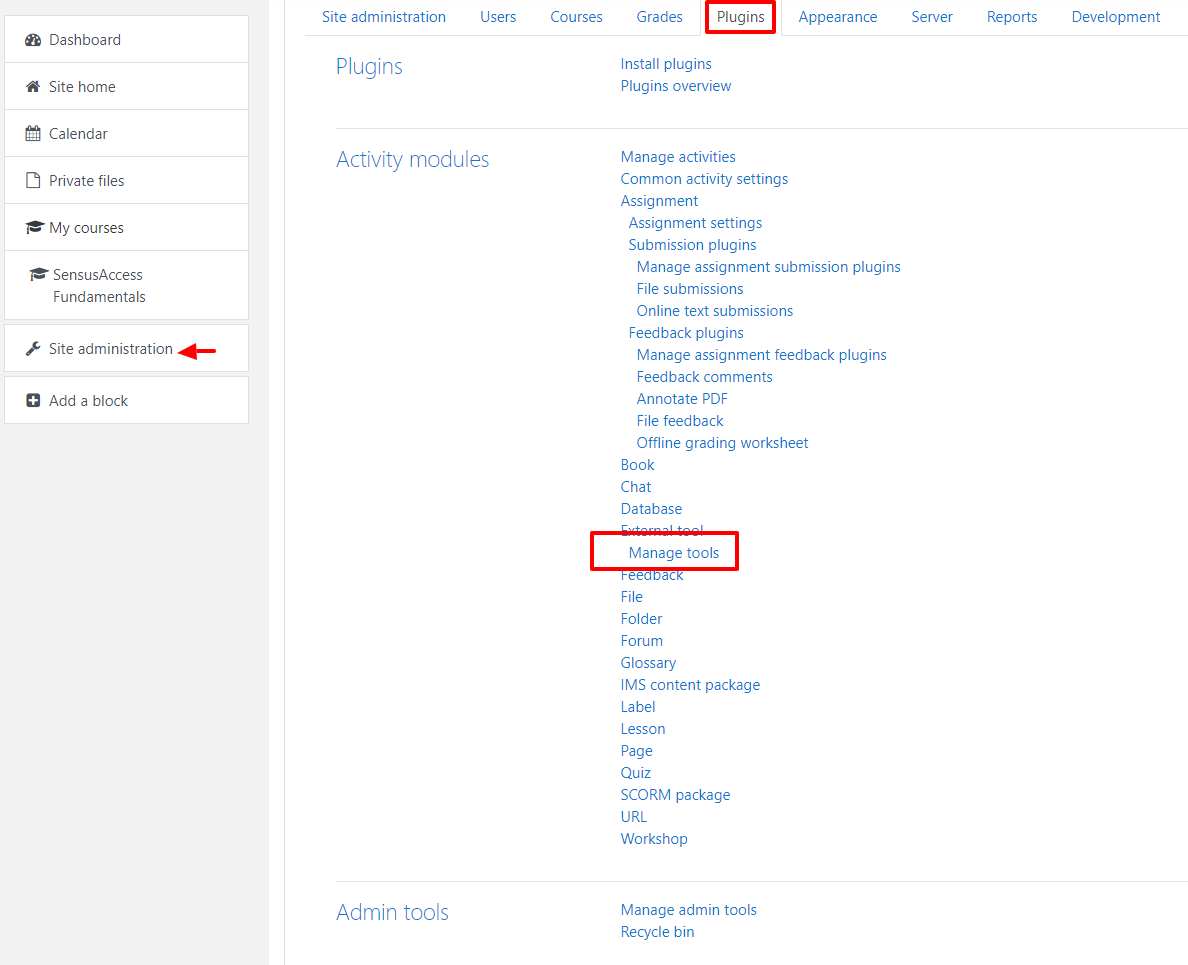
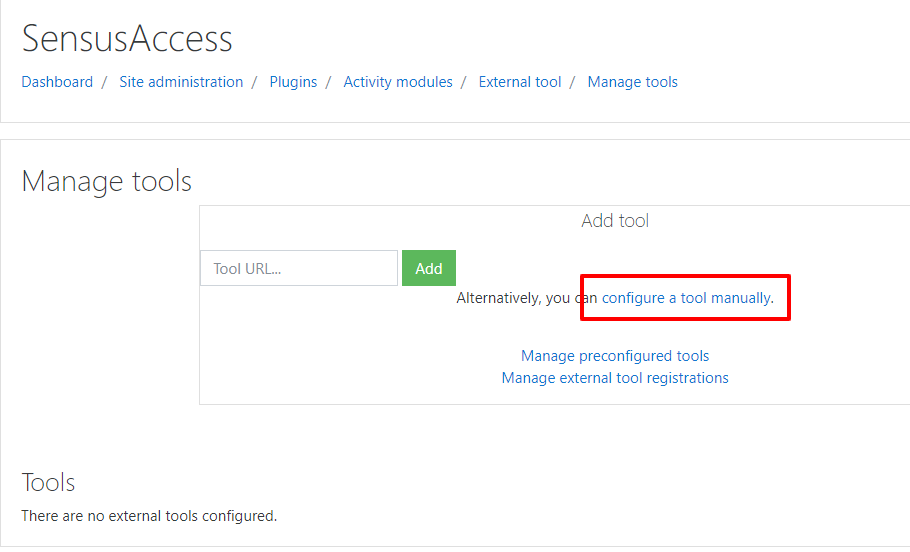
Go to Site administration => Plugins => Category: Activity modules => Category: External tool and click on Manage tools.
-
On the Manage tools page you should click configure a tool manually.
-
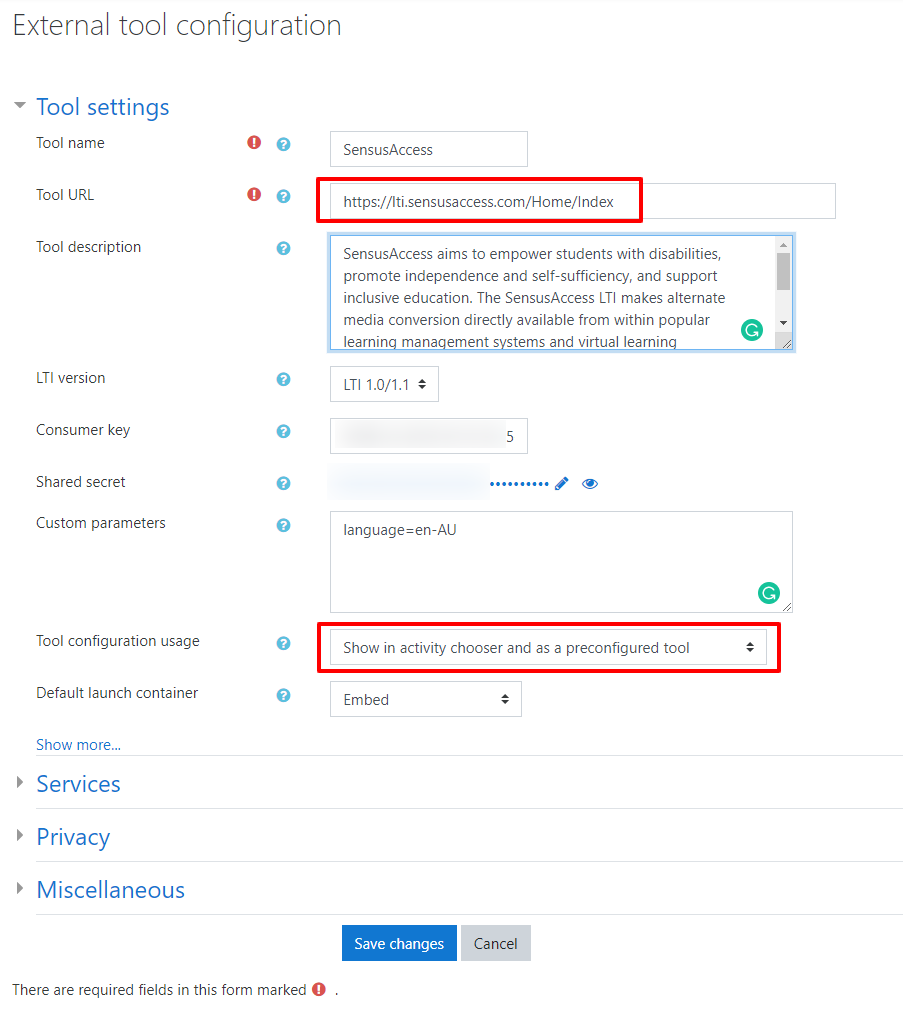
Fill the form according to the below screen.
- Tool URL should be https://lti.sensusaccess.com/Home/Index
- Tool configuration usage should be Show in activity chooser and as a preconfigured tool.
- Consumer key is the Consumer key provided by Sensus ApS.
- Shared secret is the Shared secret provided by Sensus ApS.
- Custom parameters field is used to support localization. The tool’s default language (if not supplied any value) is en-GB. But one can provide other supported options en-AU, en-US, da-DK, it-IT, fr-FR, es-ES .
- If you want to see Tool Icon instead of default Moodle icon, you can add Icon URL and Secure icon URL as https://lti.sensusaccess.com/Home/SensusAccessLTIToolIcon
- Share launcher's name with tool: Always
- Share launcher's email with tool: Always
-
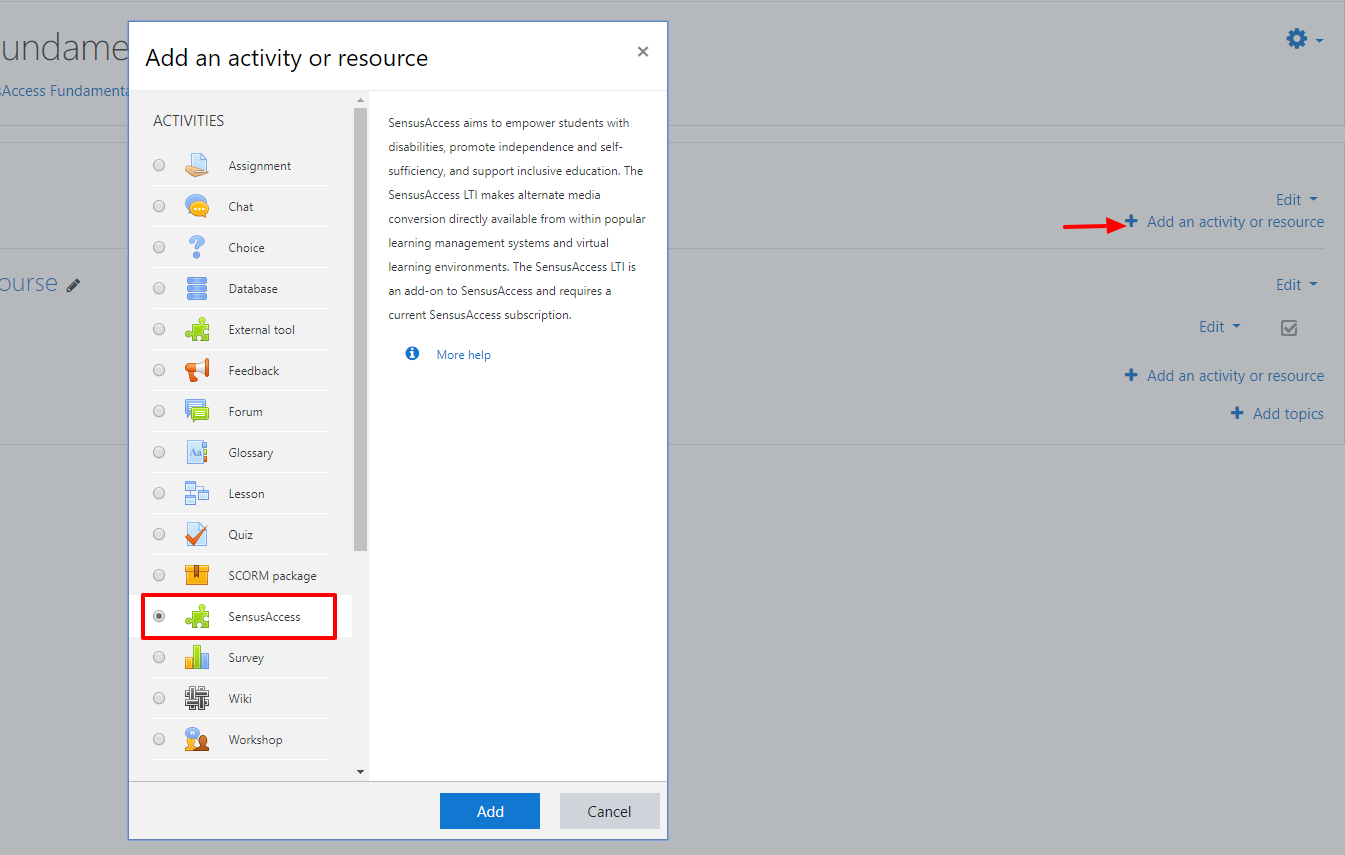
Now the tool is configurated globally and one can see the tool in the activity or resource panel as shown below.
-
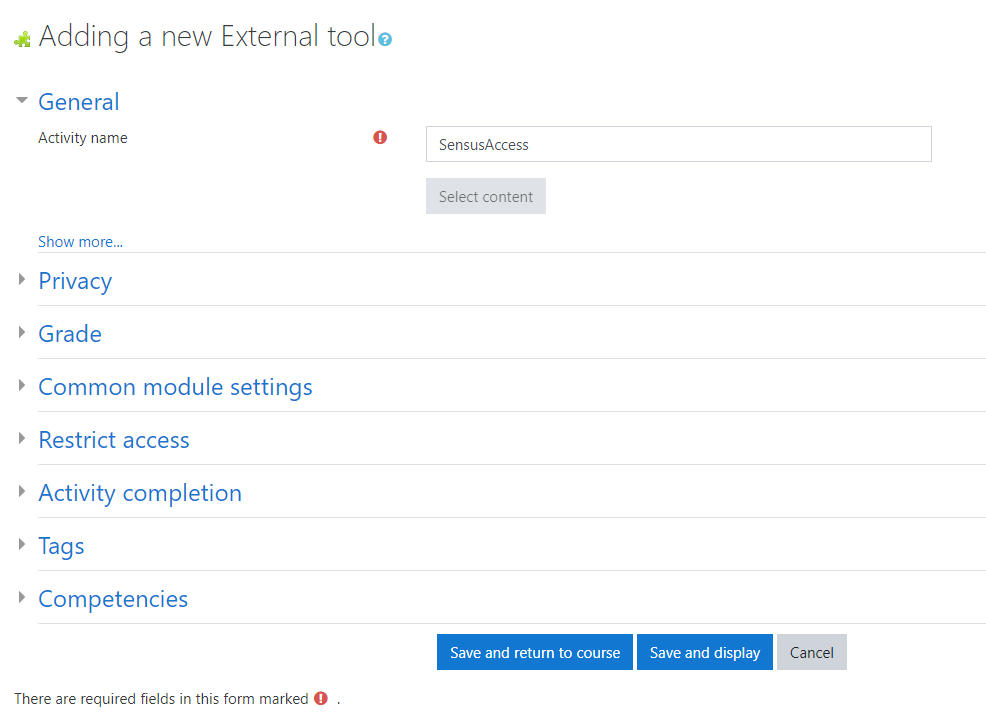
Now one can just give Activity name and remaining all configuration will be inherited from the preconfigured tool.
Note: If you experience problems with any of the above steps, please contact us via the contact options on sensusaccess.com