Guide to setup SensusAccess LTI 1.3 with Canvas
LTI Key
-
Register an account with SensusAccess LTI. Register. Once registered with SensusAccess LTI, one can receive an email confirmation mail with an approval link. Once clicked on the link and successful confirmation message, one can log in into the SensusAccess LTI portal. Remember to check spam email, if you do not see the confirmation email in the inbox.
-
Contact Sensus in order to get your LTI access credentials. In order to process your request please make sure to specify in your email/call/letter the following:
- A mention that you are requesting a SensusAccess LTI account
- Organization name (School/University)
- Full name of contact the person responsible for the SensusAccess LTI account
- The desired email address associated with the SensusAccess LTI account
- Name of the LMS Type (Canvas), you are requesting for
Log into your Canvas account (Administrator).
In Global Navigation, click the Admin link, then click the name of the Admin account.
In the Account Navigation, click the Developer Keys.
-
In the screen, click on the LTI Key
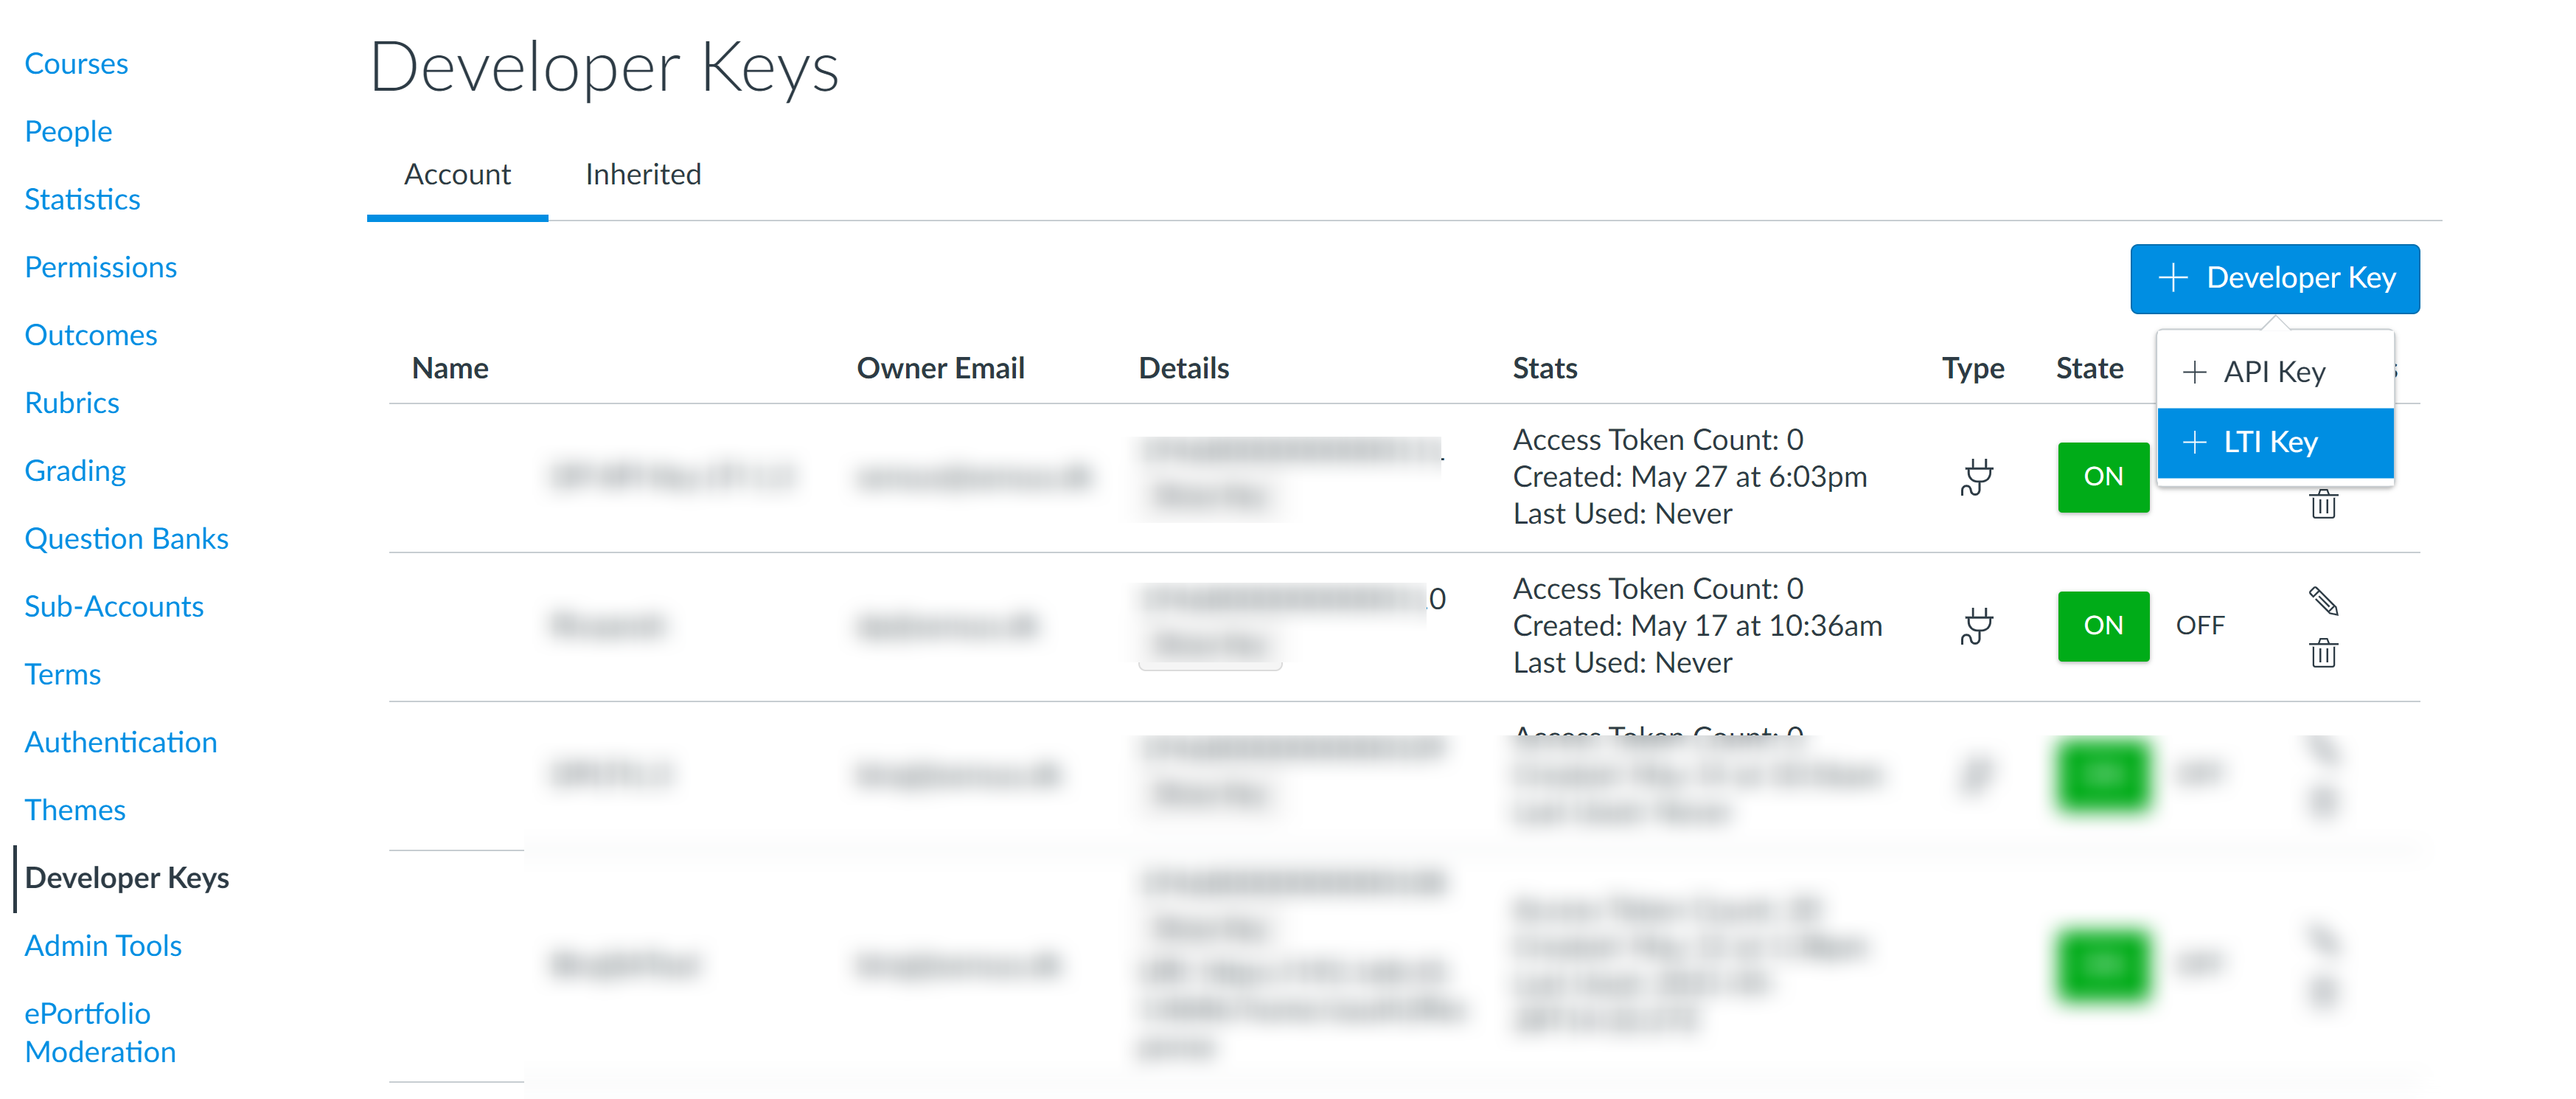
-
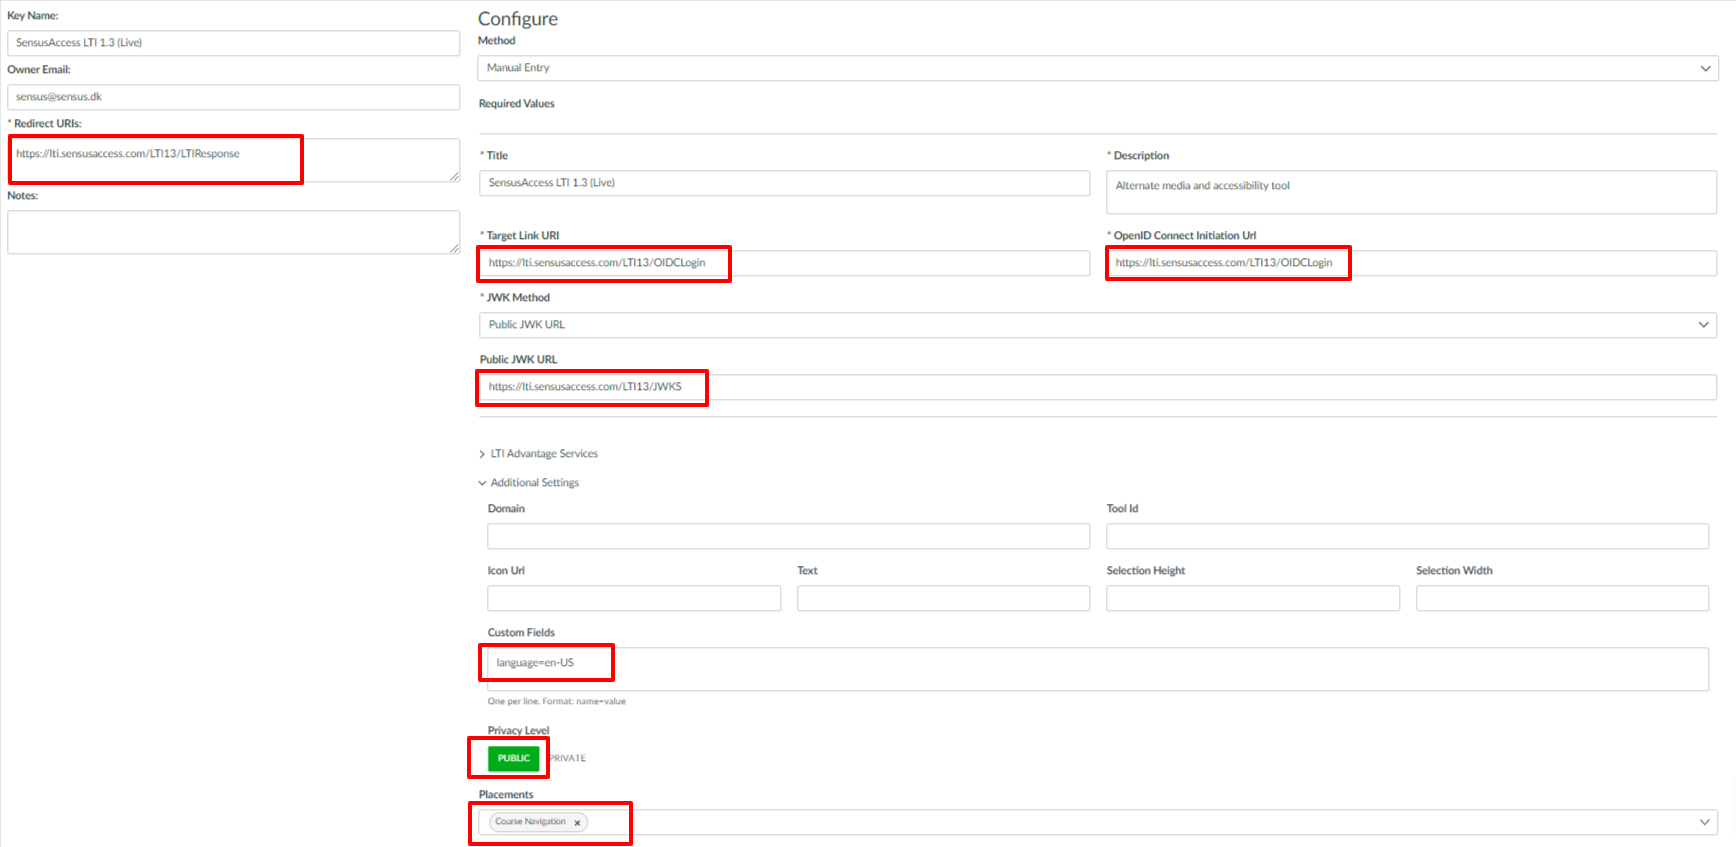
Fill the fields as per following:
Key Name: Any text
Owner Email: Any email
Redirect URIs: https://lti.sensusaccess.com/LTI13/LTIResponse
Method: Manual Entry
Title: Any text
Description: Any text
Target Link URI: https://lti.sensusaccess.com/LTI13/OIDCLogin
OpenID Connect Initiation Url: https://lti.sensusaccess.com/LTI13/OIDCLogin
JWK Method: Public JWK URL
Public JWK URL: https://lti.sensusaccess.com/LTI13/JWKS
Go to Additional Settings and provide the following details:
By default, the tool runs as British English and if you want to run as different language, you could set a custom parameter as shown in the screenshot. Custom fields is used to support localization. The tool's default language (if not supplied any value) is en-GB (British English). But one can provide other supported options like language=en-US or language=da-DK or language=it-IT or language=fr-FR or language=es-ES.
In the Privacy Level, choose the PUBLIC. The tool only needs Course Navigation in the placements, so if there are any others just remove them and add Course Navigation.
Once the form is filled, click on the Save Key.
-
In the Developer Keys listing, click ON in the State field of the LTI key and once clicked, the color of the ON would be green. (By default the State field is OFF and color of the button is red).
-
This is an optional step. If you want to make the tool not available by default for all the courses and the faculty member need to enable the tool explicitly for each course,
you need to follow this step, otherwise, you may skip to the next step.
Click on the Edit icon in the LTI key in the Developer Keys section.

When the edit page opens, choose Paste JSON from Method dropdown. In the LTI 1.3 Configuration section, add a property "default": "disabled" in the placements section. After adding the property to the existing JSON, don't forget to check the Redirect URIs on the left side. Sometimes, the value is changed to https://lti.sensusaccess.com/LTI13/OIDCLogin while adding the property. The Redirect URIs value should be https://lti.sensusaccess.com/LTI13/LTIResponse and if you find the value different than this, please correct the Redirect URLs.
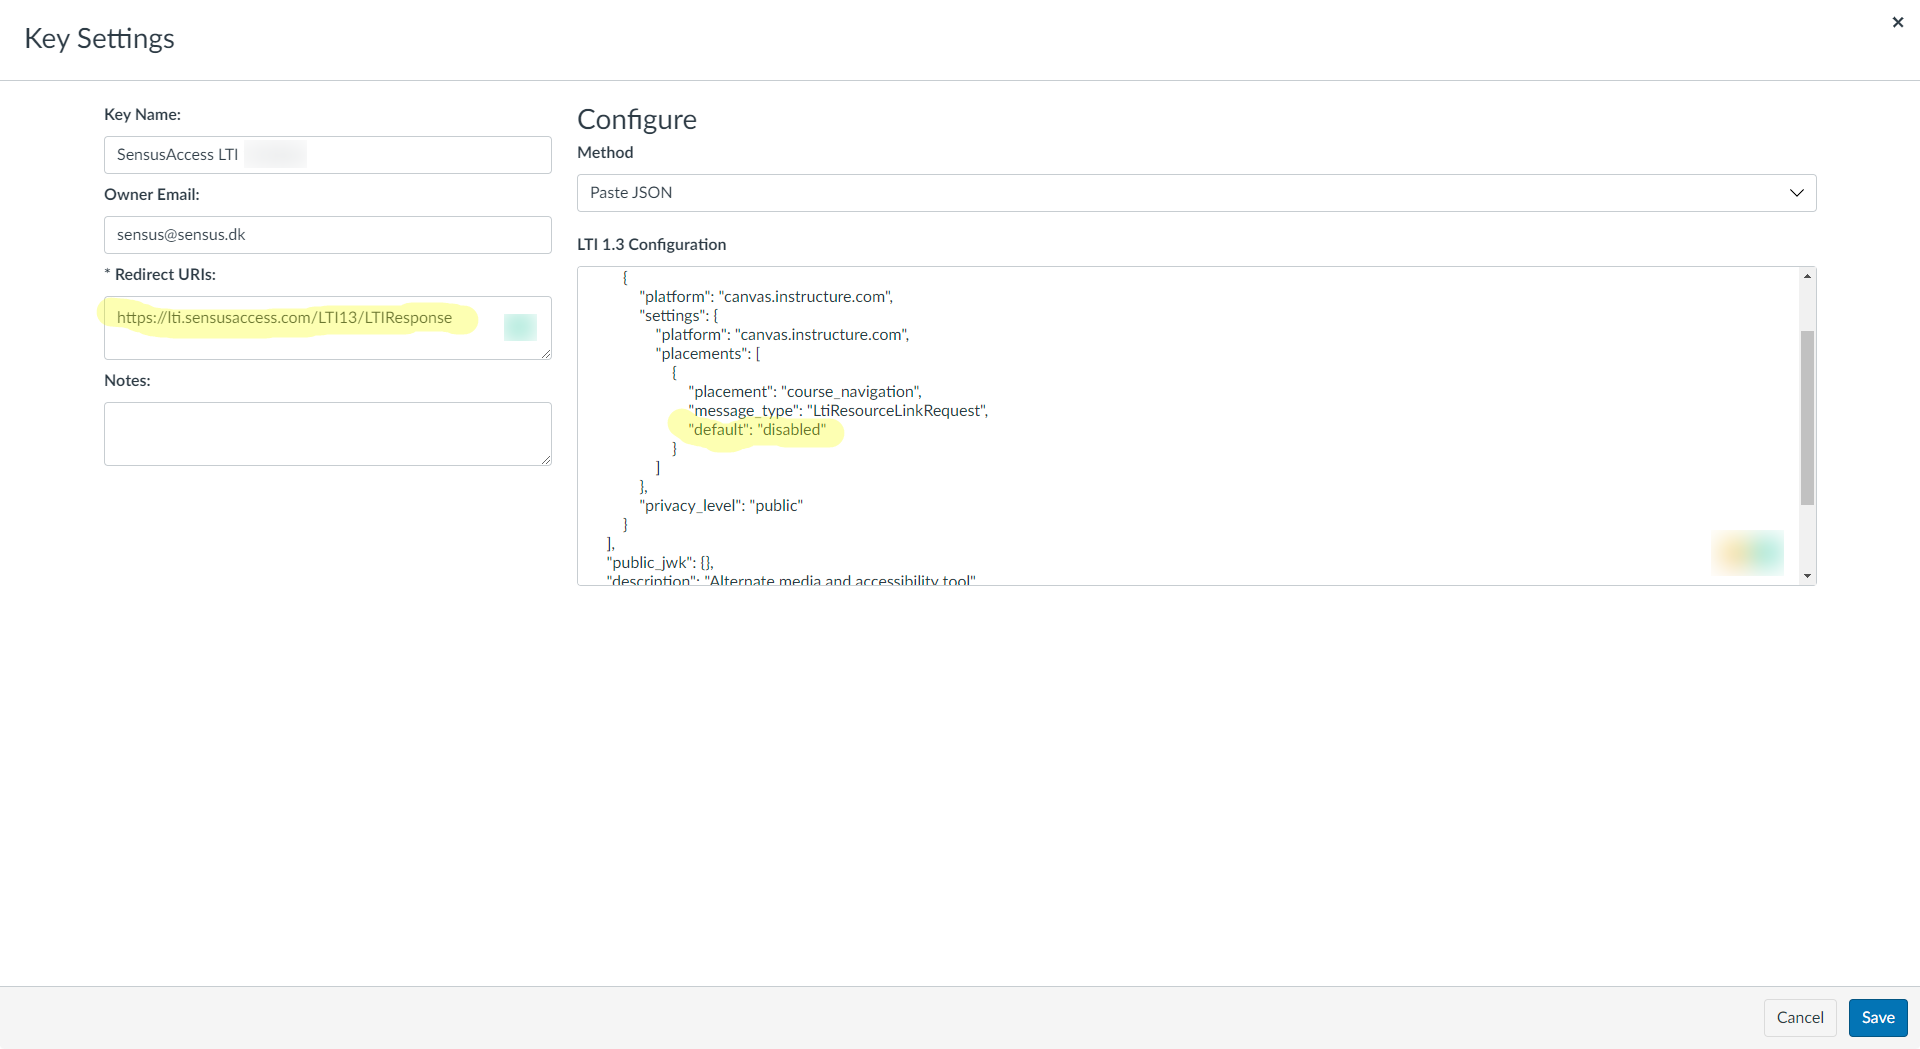
Now Click on the Save button. -
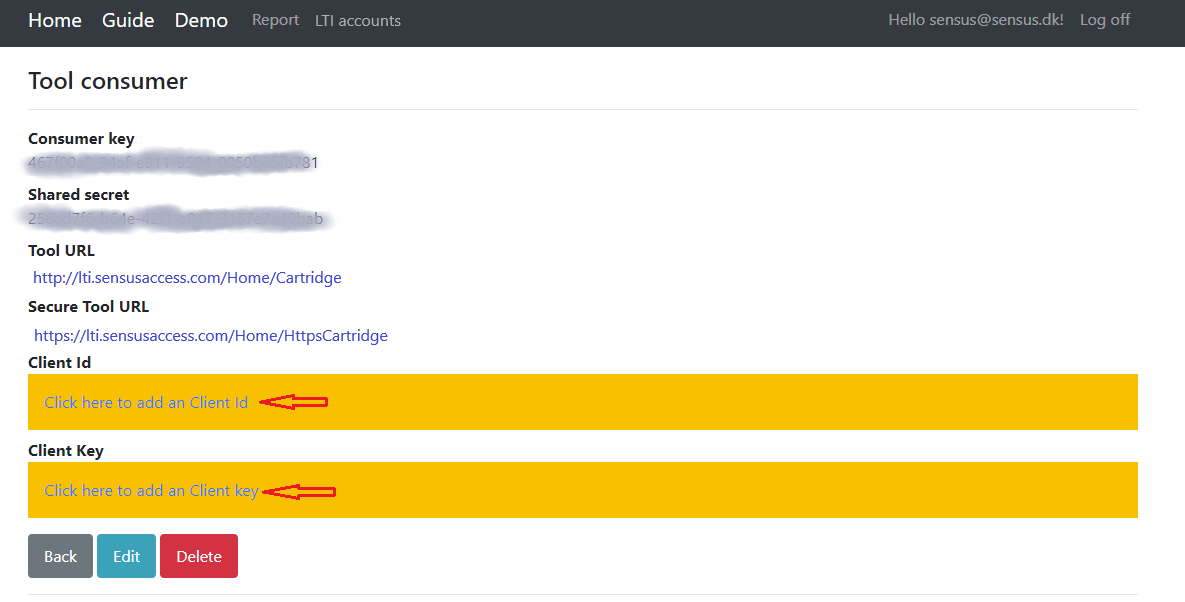
Now you have LTI 1.3 Client Id ready and its time to attach these values into your SensusAccess LTI account. LTI 1.3 Client Id is displayed in the Developer keys listing.
-
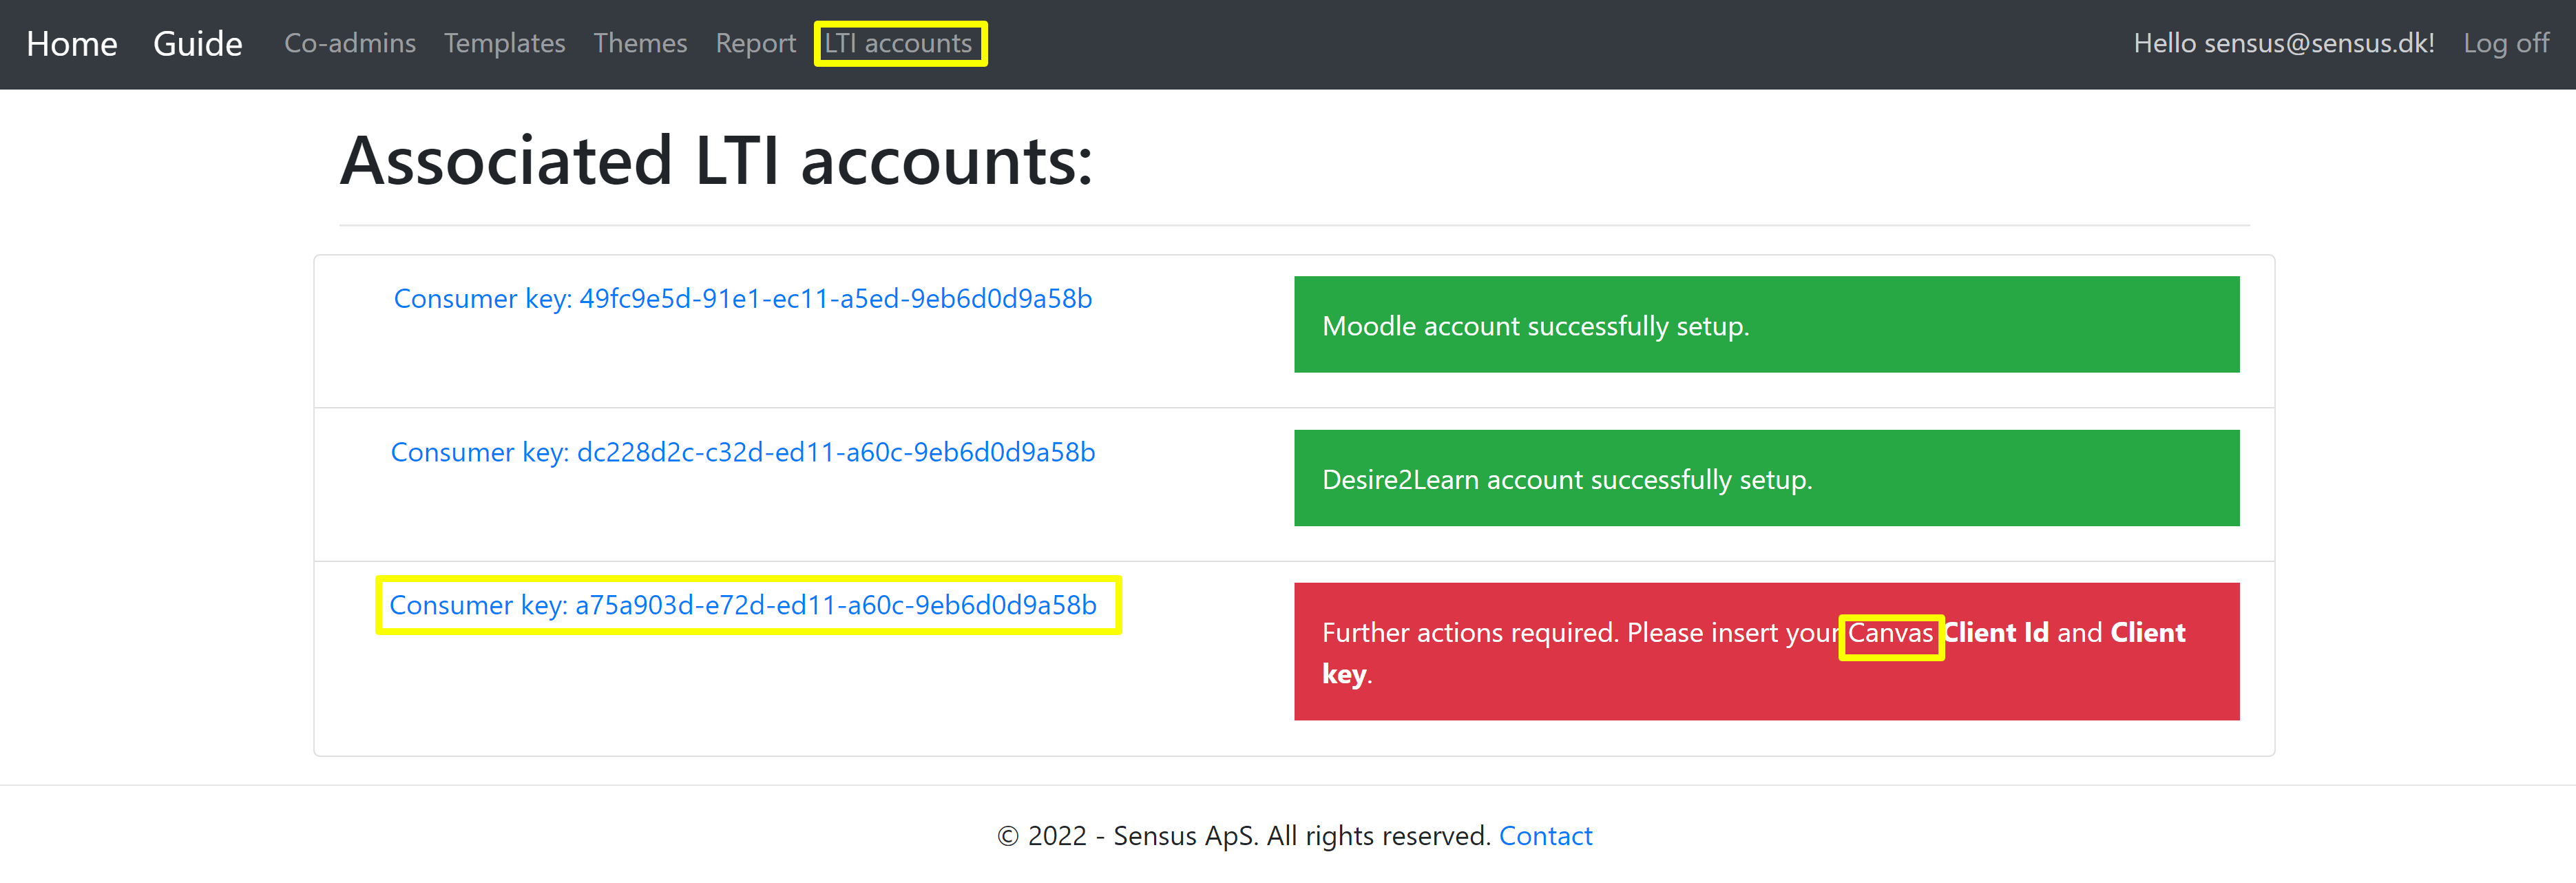
Go to your SensusAccess LTI account and then click on the LTI accounts navbar option. There might be more than one LTI accounts listed in "Associated LTI accounts" section, if the account is associated with multiple LMS.
-
Click on Edit and select LTI 1.3 from the LTI Integration dropdown, then insert the LTI 1.3 Client Id that you received in step 10 and Auth login URL as https://YourCanvasDomain/api/lti/authorize_redirect and then click on Save.
Note: Replace YourCanvasDomain with your actual instance domain. For example, the Auth login URL could be https://abc.instructure.com/api/lti/authorize_redirect if your Canvas domain is abc.instructure.com.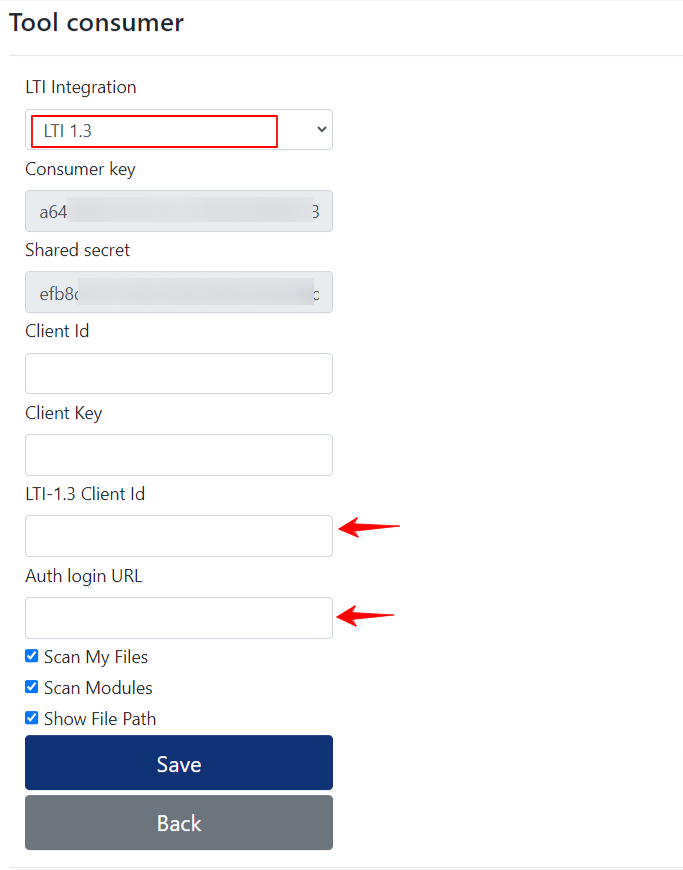
API key
Until now, you have created an LTI key and attached to the SensusAccess LTI account. It is time to create a Developer key and attach to the SensusAccess LTI account. The developer keys will be used to call the Canvas REST APIs to scan a course.
Log into your Canvas account (Administrator).
In Global Navigation, click the Admin link, then click the name of the Admin account.
In the Account Navigation, click the Developer Keys.
-
In the screen, click on the API Key

-
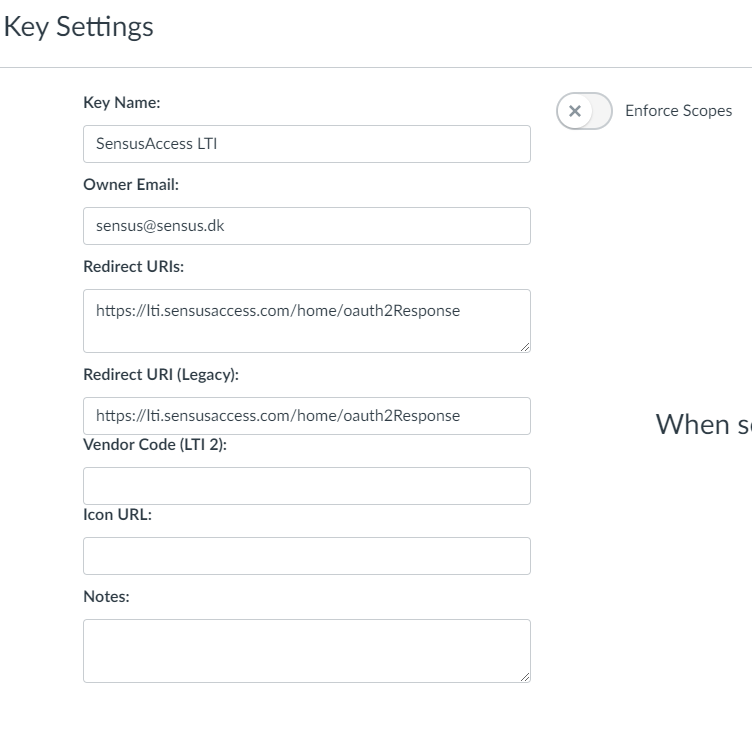
Fill the fields as per below:
Key Name: Any text
Owner Email: Any email
Redirect URIs: https://lti.sensusaccess.com/home/oauth2Response
Redirect URI (Legacy): https://lti.sensusaccess.com/home/oauth2Response
-
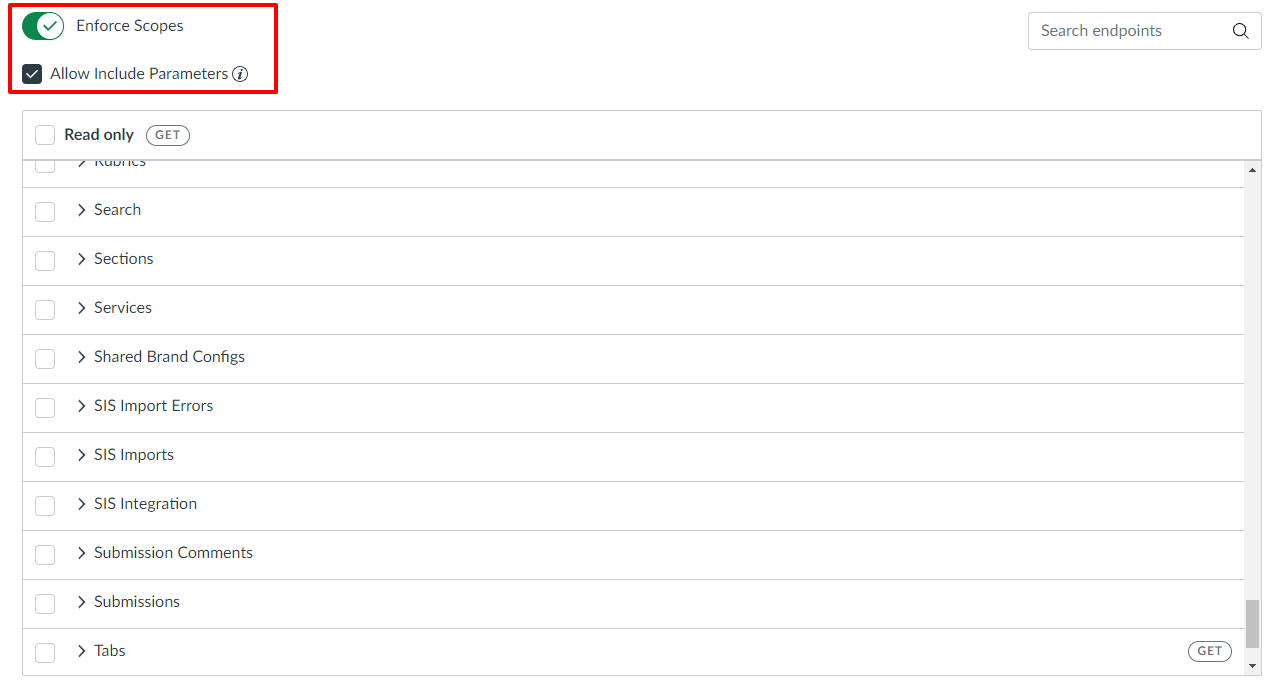
This step is an optional. This step is to enable "Enforce Scopes" to limit the access token to selected endpoints. If this is not your concern, you could skip this step.
When scope enforcement is disabled, tokens have access to all endpoints available to the authorizing user.
If you enable "Enforce Scopes" in Developer Keys, you must check 19 endpoints to run SensusAccess LTI plug-in.
Check the "Allow Include Parameters" checkbox:
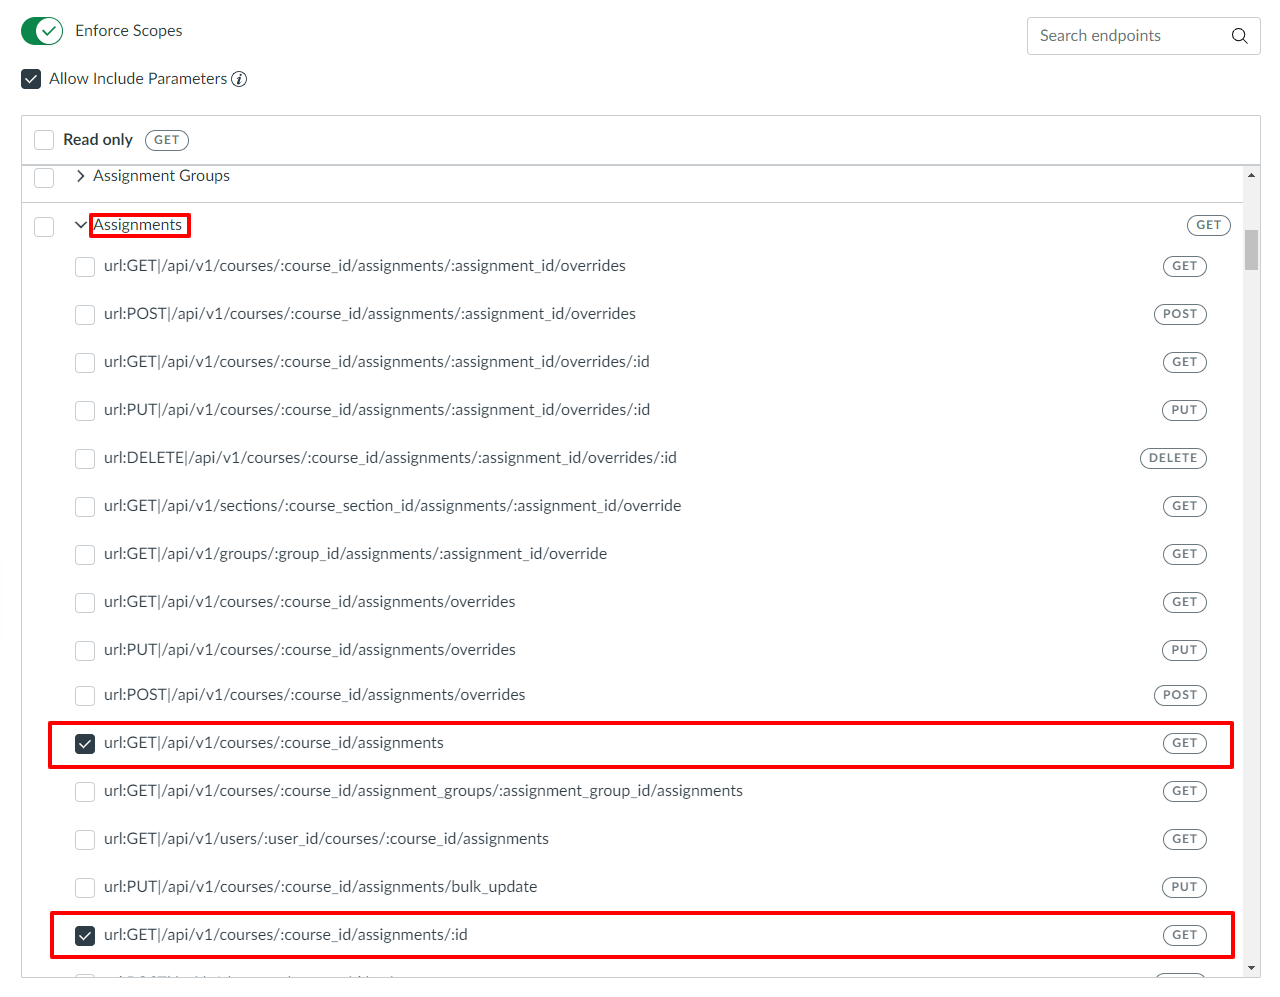
In "Assignments" section you have to check 2 endpoint as below:
url:GET|/api/v1/courses/:course_id/assignments/:id
url:GET|/api/v1/courses/:course_id/assignments
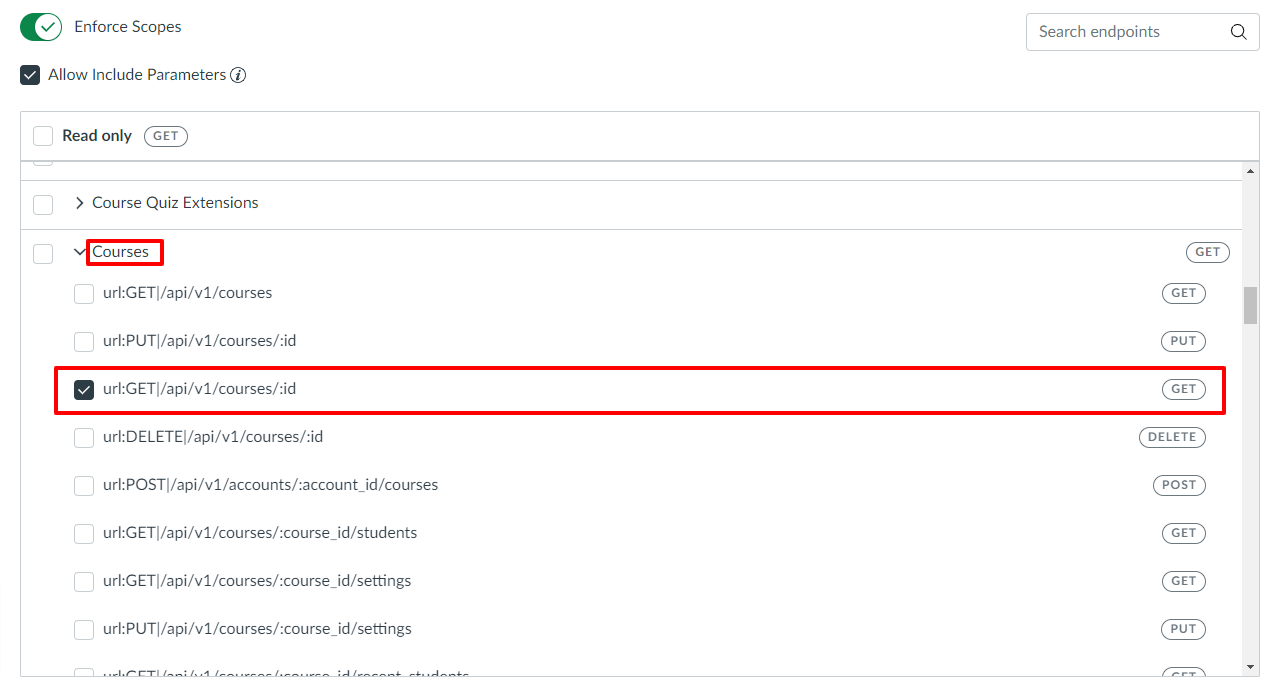
In "Courses" section you have to check 1 endpoint as below:
url:GET|/api/v1/courses/:id
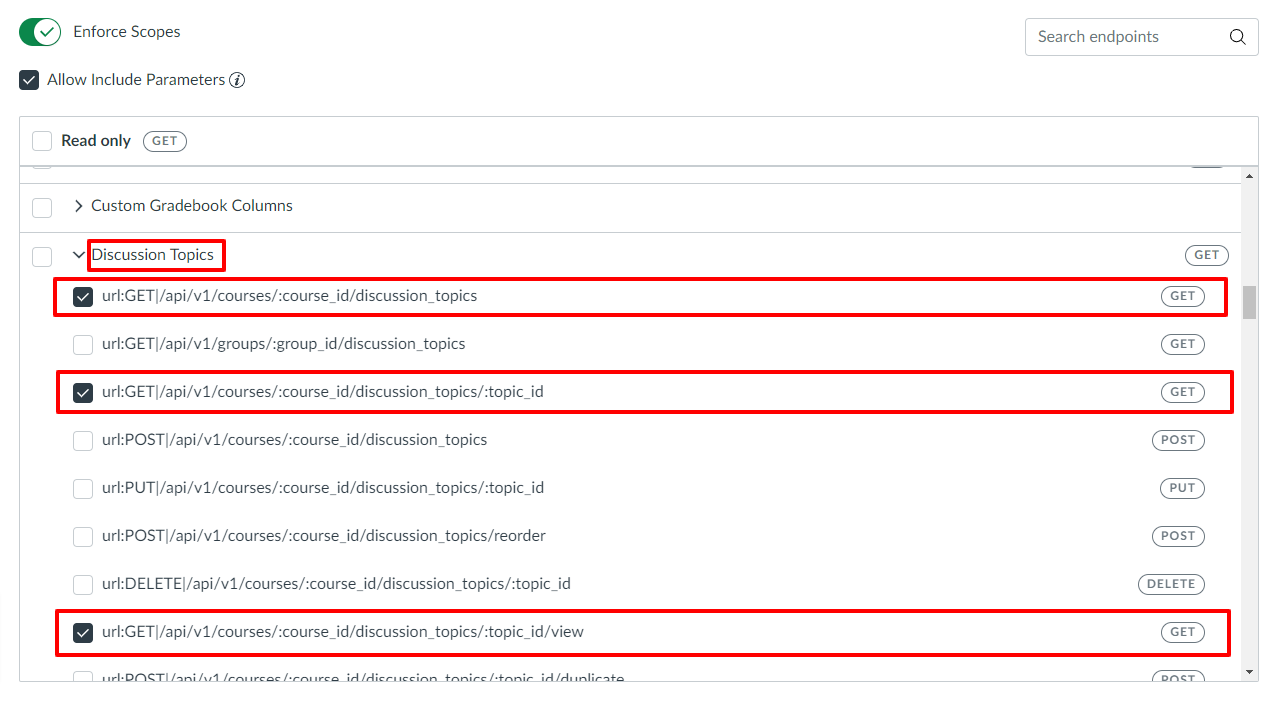
In "Discussion Topics" section you have to check 3 endpoints as below:
url:GET|/api/v1/courses/:course_id/discussion_topics/:topic_id
url:GET|/api/v1/courses/:course_id/discussion_topics
url:GET|/api/v1/courses/:course_id/discussion_topics/:topic_id/view
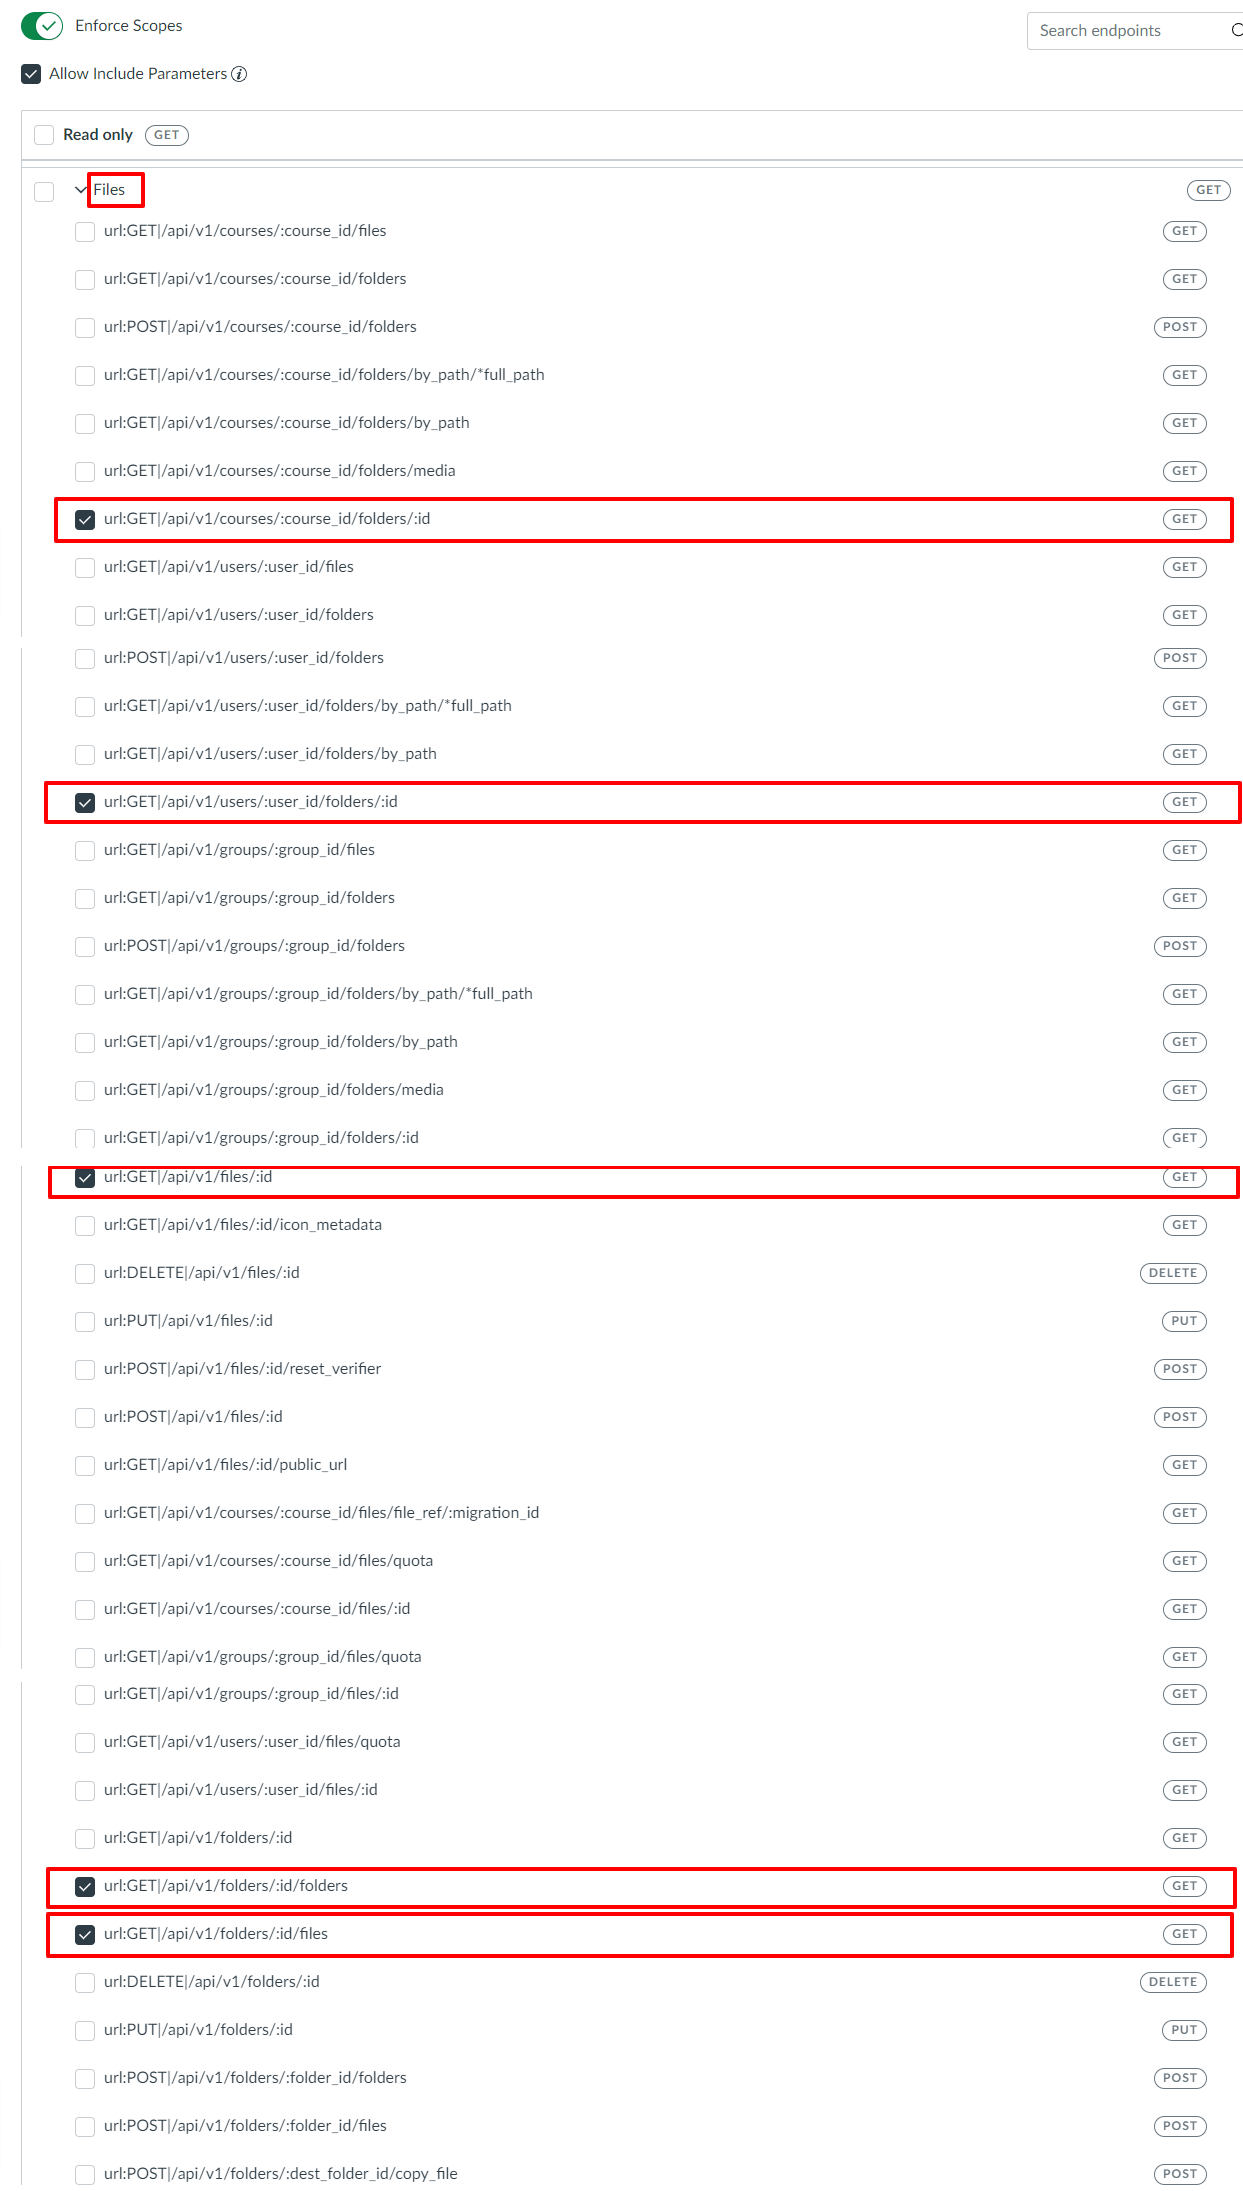
In "Files" section you have to check 5 endpoints as below:
url:GET|/api/v1/courses/:course_id/folders/:id
url:GET|/api/v1/folders/:id/folders
url:GET|/api/v1/folders/:id/files
url:GET|/api/v1/users/:user_id/folders/:id
url:GET|/api/v1/files/:id
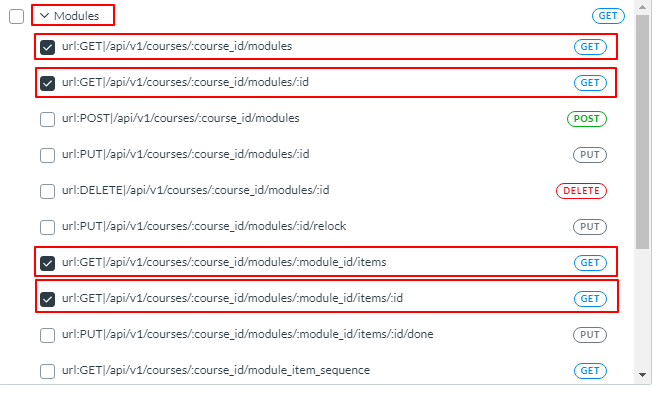
In "Modules" section you have to check 4 endpoints as below:
url:GET|/api/v1/courses/:course_id/modules
url:GET|/api/v1/courses/:course_id/modules/:id
url:GET|/api/v1/courses/:course_id/modules/:module_id/items
url:GET|/api/v1/courses/:course_id/modules/:module_id/items/:id
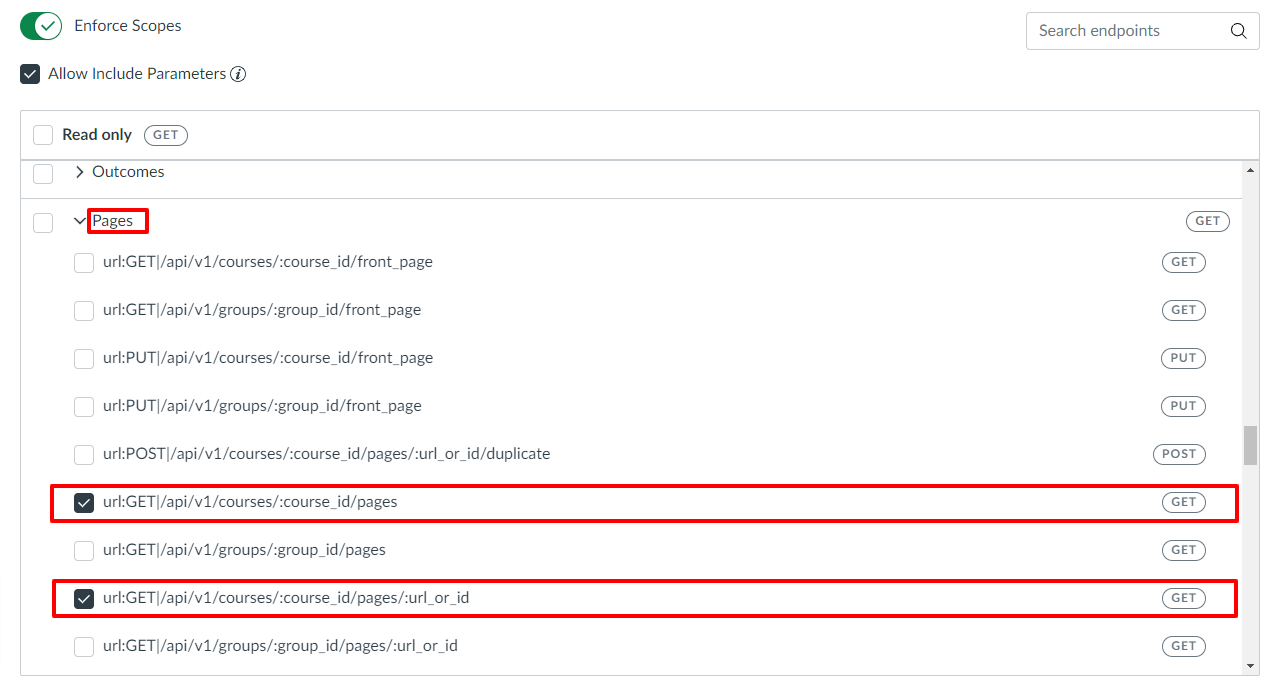
In "Pages" section you have to check 2 endpoints as below:
url:GET|/api/v1/courses/:course_id/pages/:url_or_id
url:GET|/api/v1/courses/:course_id/pages
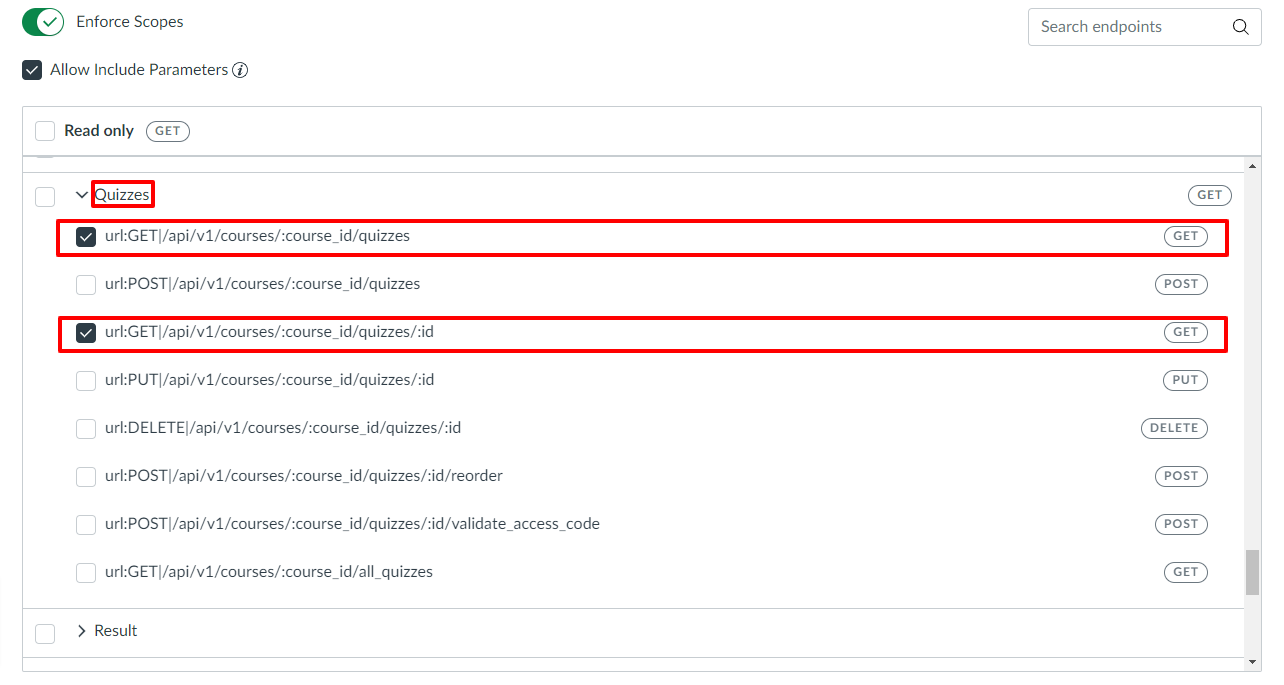
In "Quizzes" section you have to check 2 endpoints as below:
url:GET|/api/v1/courses/:course_id/quizzes/:id
url:GET|/api/v1/courses/:course_id/quizzes
Once the form is filled, click on the Save Key.
-
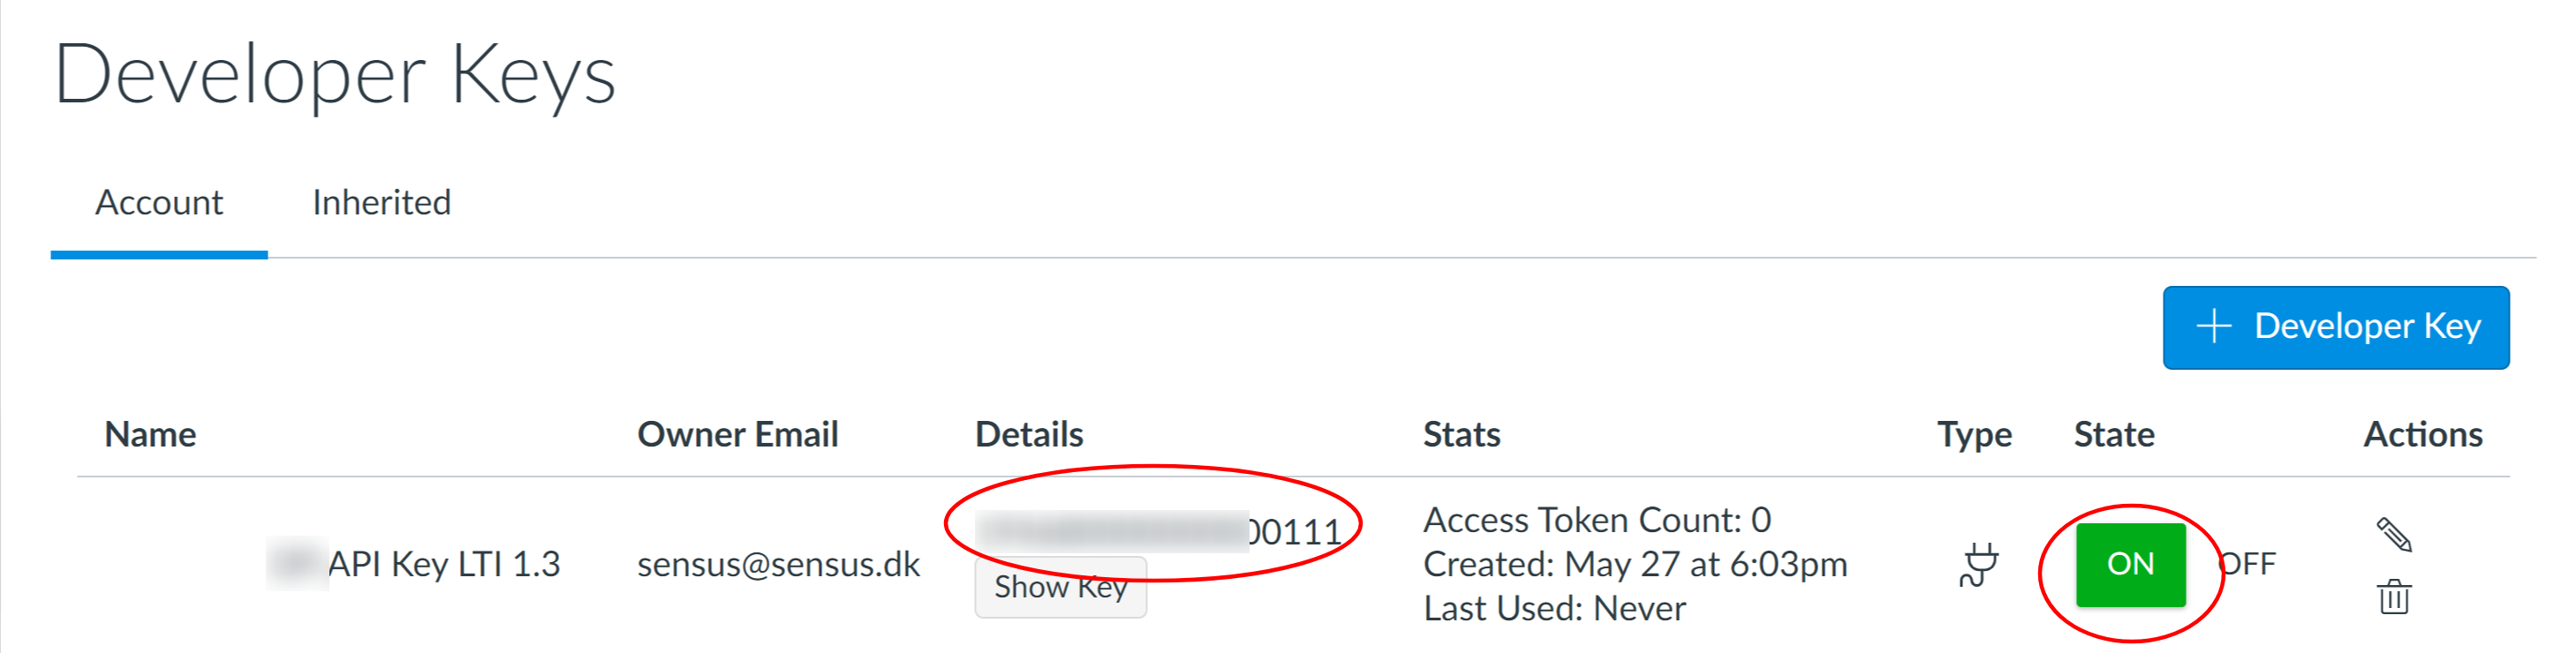
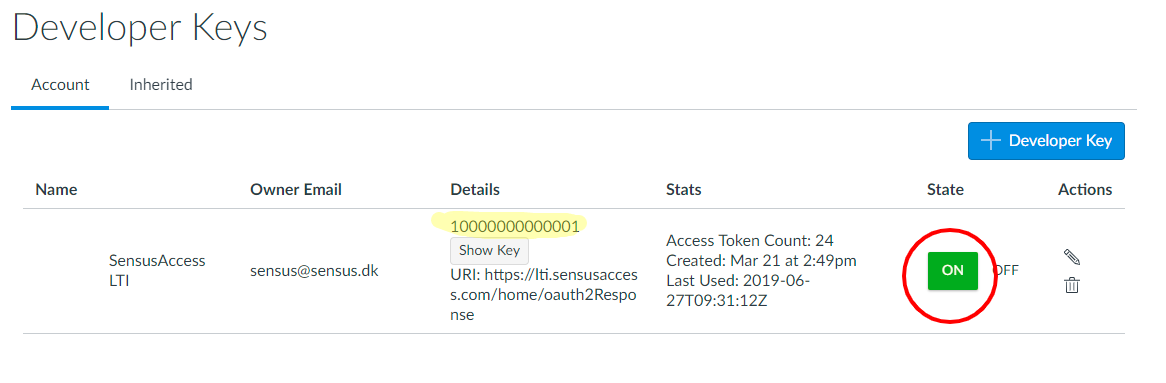
In the Developer Keys listing, click ON in the State field and once clicked, the color of the ON would be green. (By default the State field is OFF and color of the button is red).
-
Now you have Client Id and Client Secret ready and its time to attach these values into your SensusAccess LTI account. Client Id is displayed in the Developer keys listing (For example, 10000000000001 as highlighted in the picture) and to view the Client secret, click on the Show Key and the value will be displayed in the dialog.
-
Go to your SensusAccess LTI account and then click on the LTI accounts navbar option. There might be more than one LTI accounts listed in "Associated LTI accounts" section, if the account is associated with multiple LMS.
-
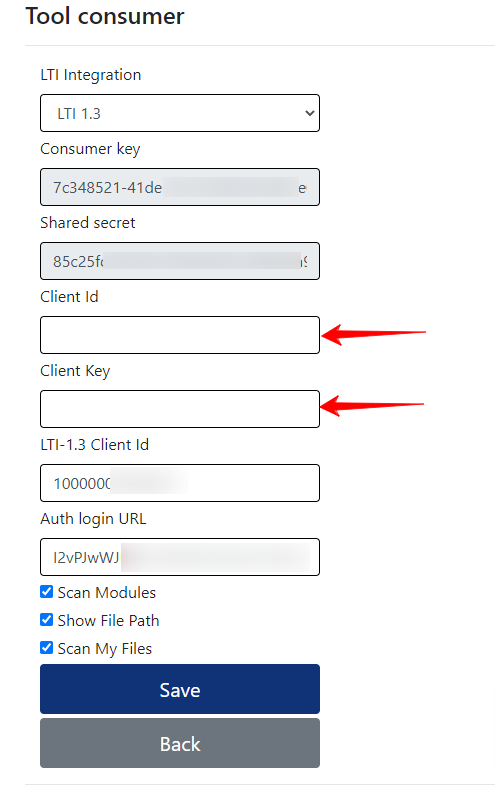
You have to input Client Id and Client Secret that you received in step 9.
-
Select LTI 1.3 and insert the Client Id and Secret key and then click Save.
-
Remaining in the LTI account page, you will see the folloing screen.
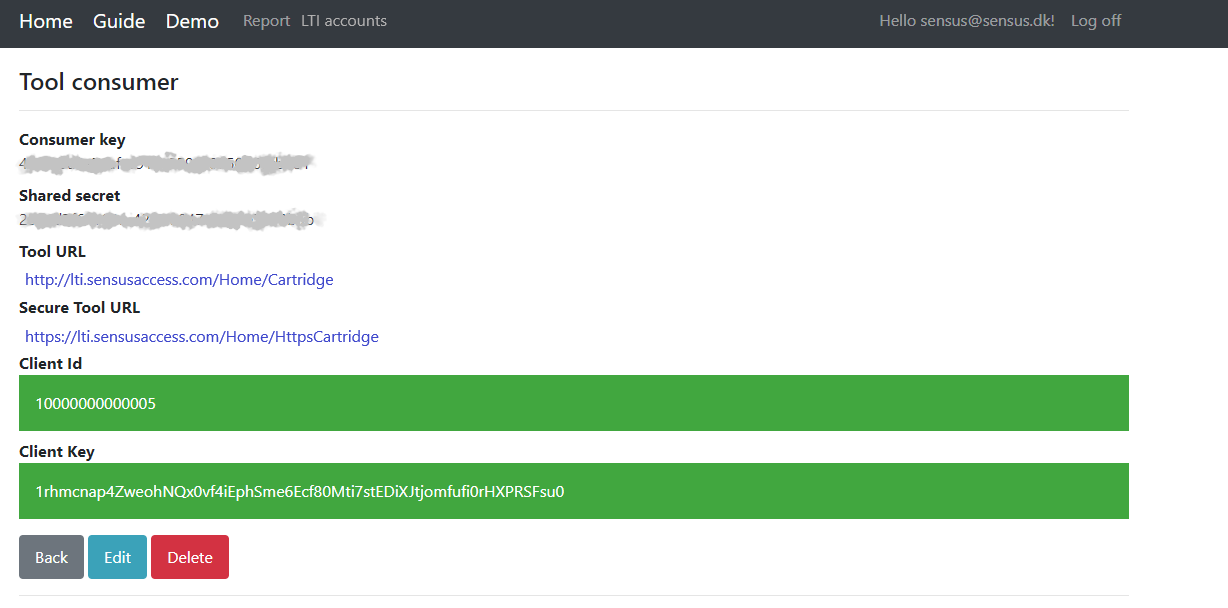
-
Note: Now, after logging into the SensusAccess LTI page the Associated LTI account you have just finished setting up will appear in green.

Now lets embed the SensusAccess form inside any course within your Canvas instance. here are two ways to configure the SensusAccess LTI tool to Canvas i.e. just for a course or for all courses in the Canvas instance.
-
To configure for all courses in the system, click on the Admin link and click on the account. Go to the Account Settings page (On the left submenu it is the last item).
Alternately, To configure for a course, navigate to the course where the SensusAccess form will be embedded. Go to the course Settings page (On the left submenu it is the last item). -
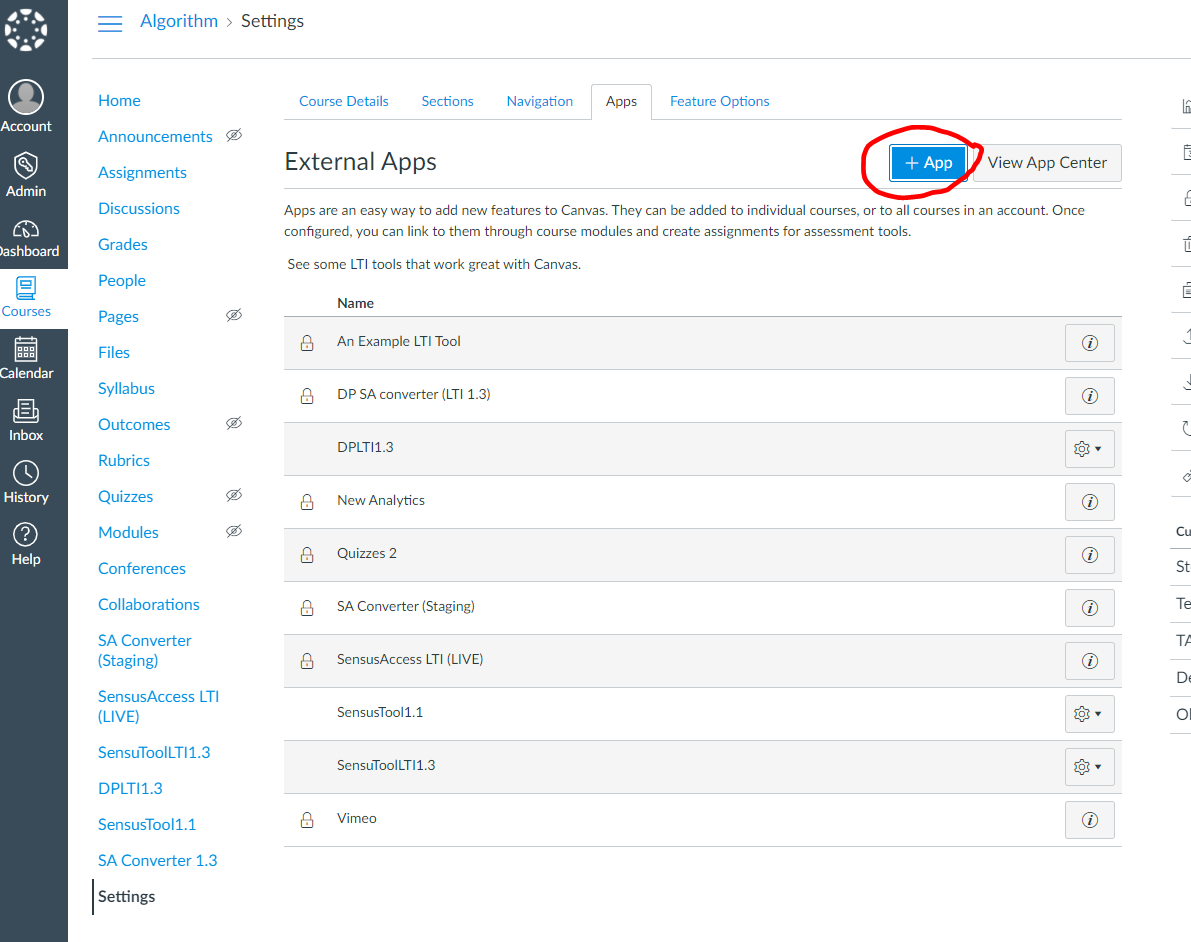
Go to the Apps tab and click on the View App Configurations button on the top right side. The form is similar in both All courses level or for a course level configuration.
-
In the External Apps menu click on the + App button on the top right side.
-
After that in Configuration type select By Client ID and provide your LTI 1.3 Client ID and click on the Submit button. You would get the Client Id from the step 10 of the LTI key section.
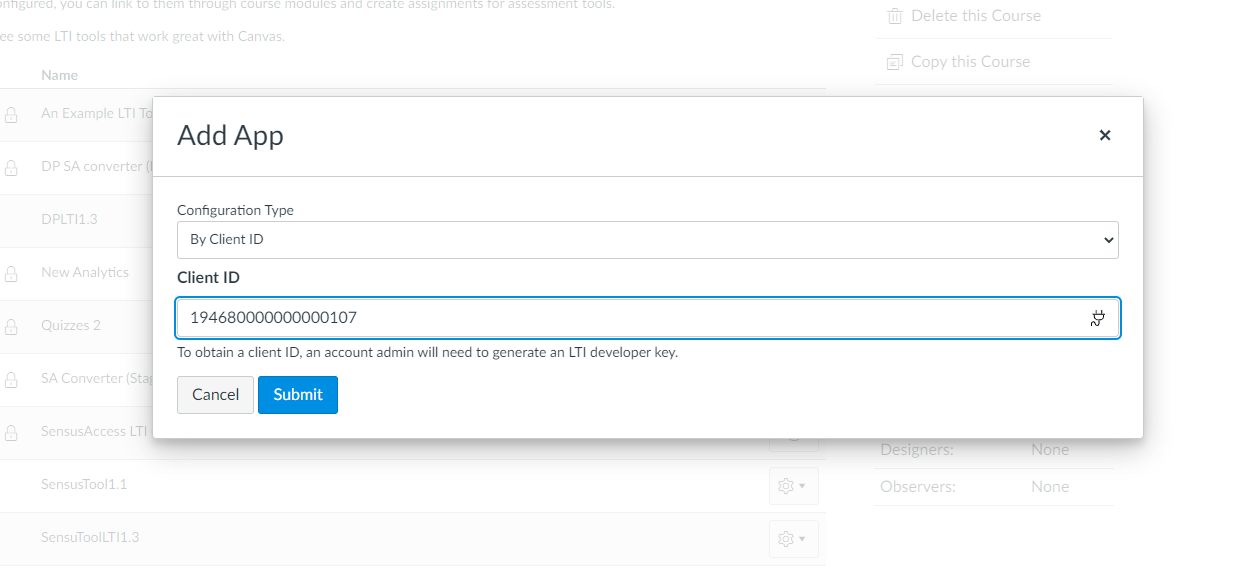
-
Navigate back to the Home page (On the left submenu it is the first item) of your course.
-
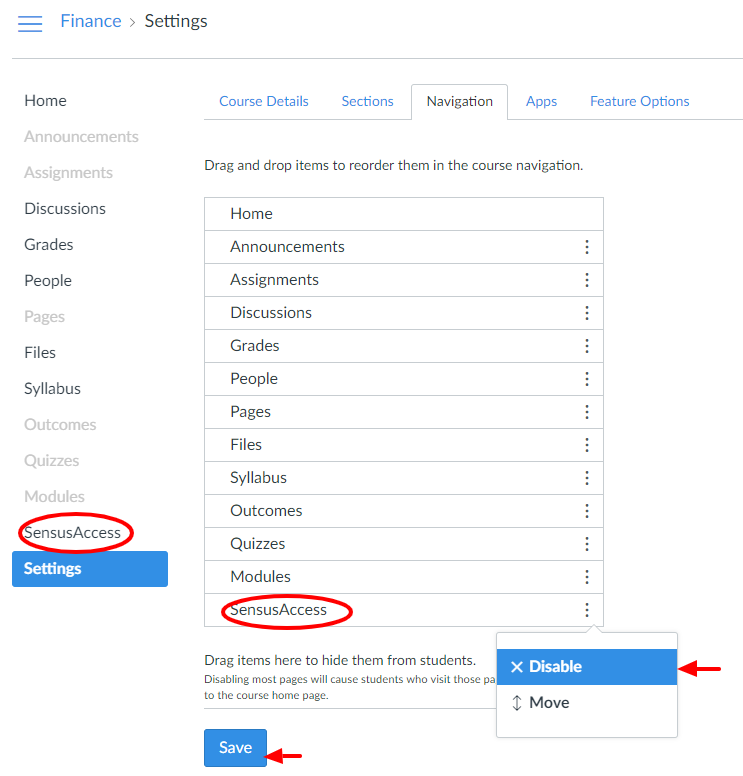
To enable/disable the tool for a course, Go to Settings and click on Navigation and Disable or Move the tool down the area "Drag items here to hide them from students." as shown below.
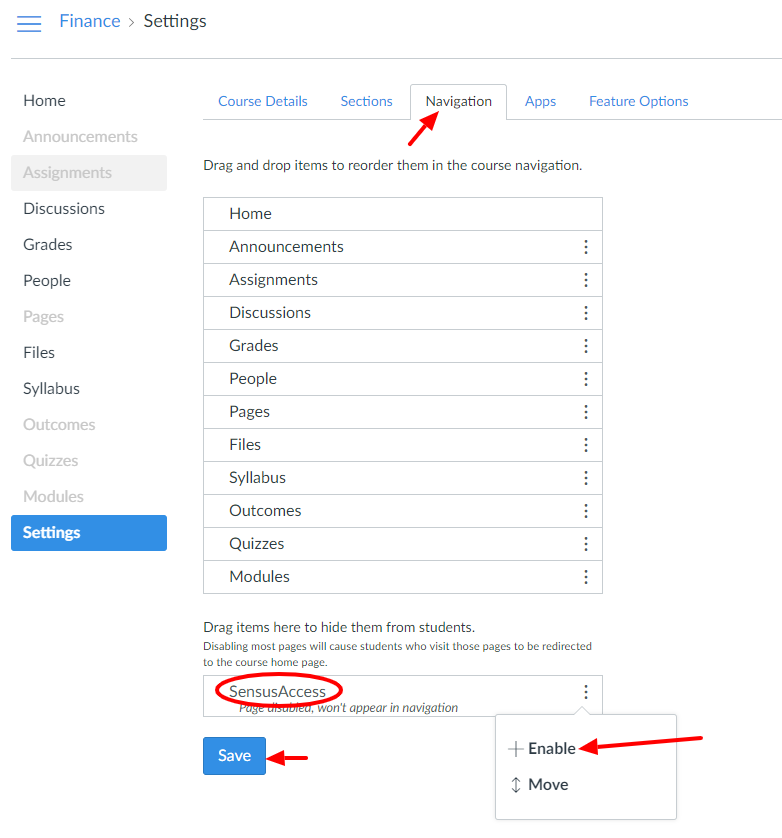
Follow the screen below to enable the tool again for a course.
-
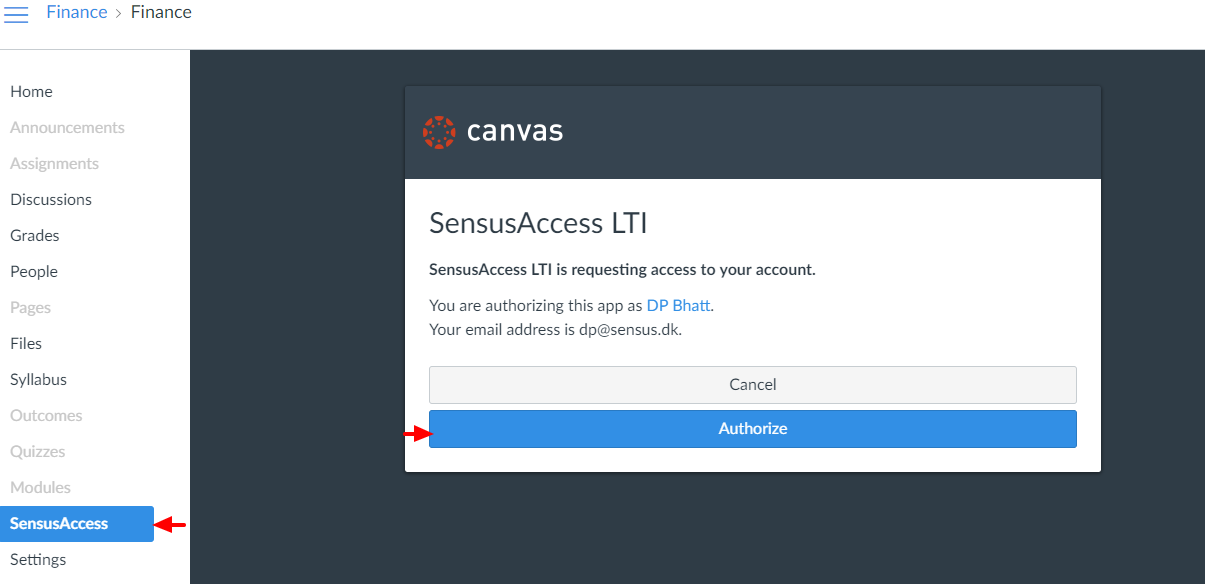
On the course menu on the left side, you will see a menu item SensusAccess. Clicking on the SensusAccess link will redirect you to Canvas authorize page, and clicking on the Authorize button will issue a token to the SensusAccess LTI tool and the SensusAccess conversion form will be displayed.
-
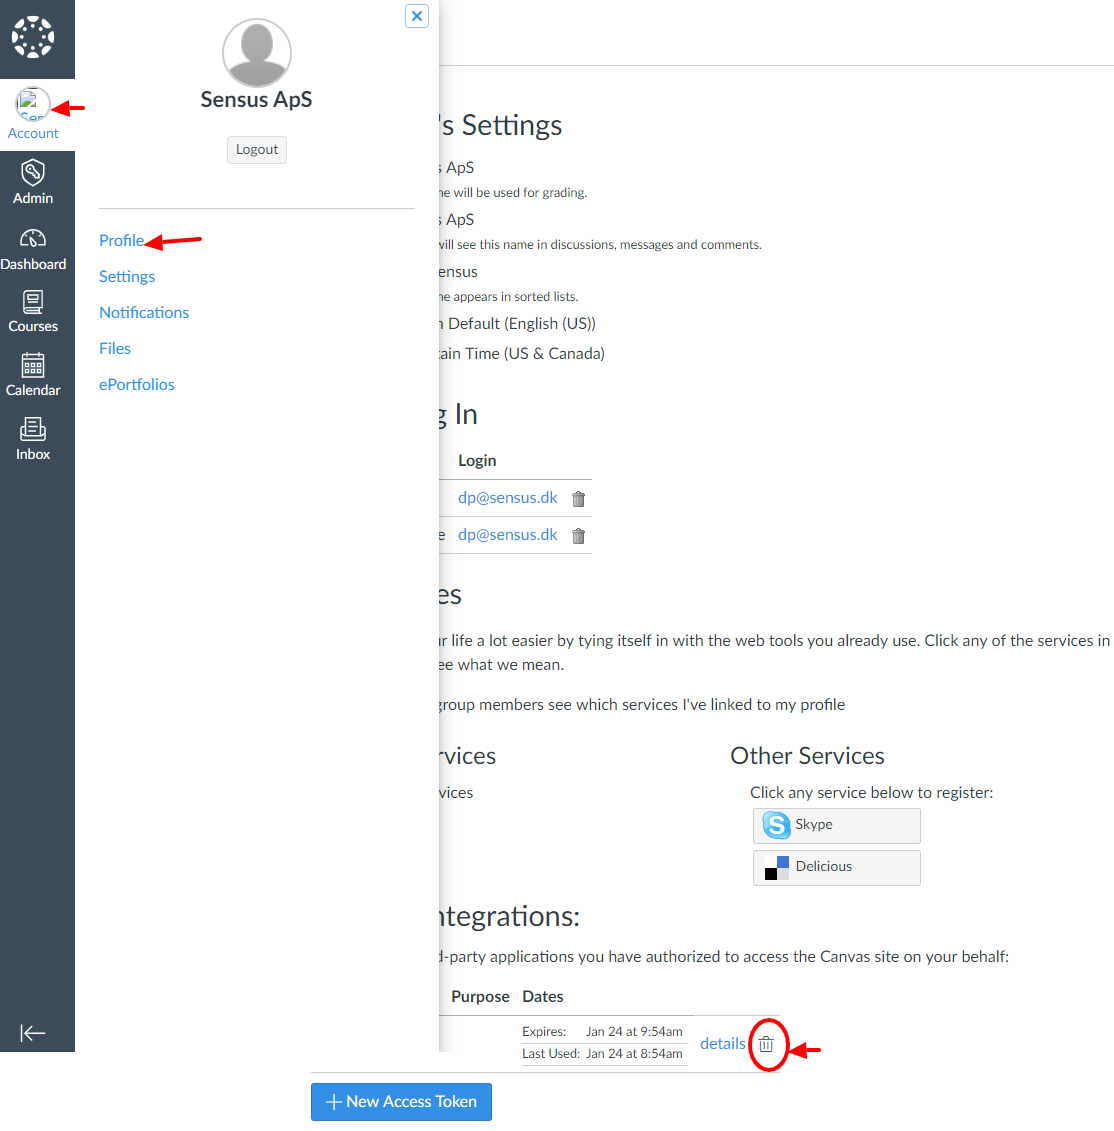
If you want to revoke the token from the SensusAccess LTI, you can do so by deleting the token associated with the tool from the Account and Profile link.
-
Once done you will be able to add the LTI Tool to any course and the SensusAccess form will appear.
The form will load automatically when clicking on the embedded link inside any course, as in the Demo. It should also be able to list all files within the course and the conversion results will be available either for direct download or sent to the email address of the logged in user.
If instead of the SensusAccess form you are presented with the SensusAccess LTI home page. Please check again that all the necessary configurations have been done correctly inside your SensusAccess LTI account.
Note: If you experience problems with any of the above steps, please contact us via the contact options on sensusaccess.com